Monday, September 21, 2009

How To Cluster SpringSource tc Server™

I decided to pull together this HowTo while working on a tc Server screencast for Chariot Solutions' booth at SpringOne 2GX. For the unfamiliar, tc Sever is an enterprise version of Apache Tomcat provided by SpringSource™.

There are a number of differences between tc Server and Apache Tomcat, however, at their core they are the same server. As SpringSource puts it, tc Server is "hardened for enterprise use". There is plenty of information about tc Server on SpringSource's website so I won't go into the details here. The main focus of this post is to describe how to get a small cluster (session replication) of tc Servers up and running.

Clustering

tc Server clustering provides session replication and context attribute replication. Session replication is basically copying the HttpSession object to all members of a cluster each time it has changed. Typical web applications use the HttpSession object to temporarily store user specific information like shopping cart items, security credentials, etc. When the user's web session is terminated (e.g. by the user, server crash, etc.) then all the session data is lost, which can cause serious usability and availability problems. The following steps will provide you with a simple (3) node tc Server session replication cluster, which provides a stable platform configured for high availability.

NOTE: If you have a large cluster with many nodes then SpringSource recommends a more advanced cluster configuration that replicates session information to a single backup member.

What You Need
  • tc Server installation - I used a server-only platform neutral distribution (tcServer-6.0.20.B-GA-appserver.tar). You can download an eval from SpringSource's website.
  • JDK 1.5 or 1.6 - I used Sun JDK 1.6
  • Mac, Unix or Linux platform - you can install on Windows however, the following instructions are specific for a Unix platform.
High-level Steps
  • Install & Test tc Server
  • Create tc Server instances
  • Configure Clustering
  • Build and Deploy a Test Web Application
  • Test the cluster
Install & Test tc Server

1. Install a JDK.

NOTE: If you are installing on a 64-bit UNIX platform then you must explicitly set the JAVA_HOME environment variable. This also helps later when creating a tc Server instance using the tcserver-instance.sh script.

2. Unpack the tc Server distribution in a temp directory using the following command.

$ tar -xf tcServer-6.0.20.B-GA-appserver.tar

3. Change to the temp directory containing the unpacked tc Server installation files.

4. Run the installer program using the following command.

$ ./install.sh
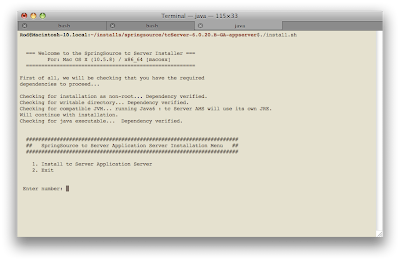


a. Enter a 1 and hit return.
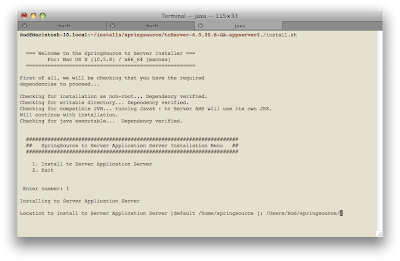


b. Specify the full path to the location where you want to install tc Server and hit return.

NOTE: The installer will not create a directory for you so it must exist.
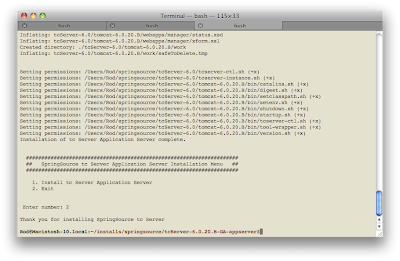


c. Enter a 2 and hit return to exit the installer.

tc Server is now installed with an ASF layout of a tc Server instance. The ASF layout is the Apache Tomcat directory structure layout. There is also a tc Server layout that we will use when clustering the servers. There are some differences between the layouts.

5. Test your installation. First change directory to the bin directory of the default tc Server instance INSTALL_DIR/tcServer-6.0/tomcat-6.0.20.B/bin.

6. Start the tc Server instance.

$ ./tcserver-ctl.sh start

OR

$ ./tcserver-ctl.sh run

The 'start' command starts tc Server as a daemon process. The 'run' command starts tc Server as a foreground process.

7. Open a web browser and point to http://localhost:8080/ and you should see the follow home page for the server.
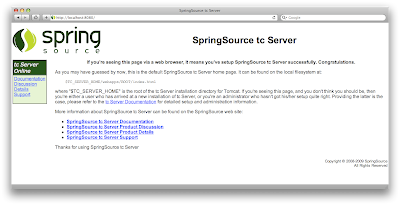


You can now shutdown the server. If you started the server using the 'run' command then you can use ctrl+c to shutdown. If you started the server as a daemon process then use the following command to shutdown:

$ ./tcserver-ctl.sh stop

Congratulations! You've successfully installed and tested tc Server in a few short steps.

Creating tc Server instances

I've decided to use the tc Server layout for the instances so that means we need to create them with a tc Server script.

1. Change directory to the INSTALL_DIR/tcServer-6.0

2. Run the tcserver-instance.sh with the required -s (servername) and -v (tc Server version) options.

$ ./tcserver-instance.sh -s tcserver1 -v 6.0.20.B
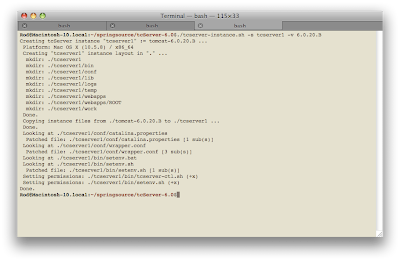


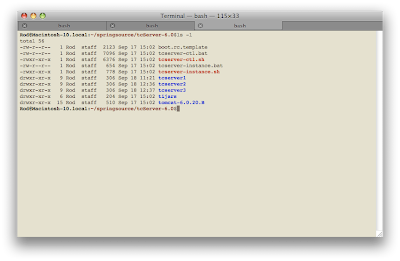
3. Repeat step #2 two more times for servername tcserver2 & tcserver3. You should have a directory structure similar to this:


4. Test each instance (tcserver1, tcserver2 & tcserver 3) one at a time to confirm that they start up ok. Since all 3 instances are using the same ports right now you have to test one at a time.

Configure Clustering

1. For each tc Server instance (tcserver1, tcserver2 & tcserver3) add the following <Cluster> child element of the <Engine> element in the INSTALL_DIR/tcServer-6.0/tcserver1/conf/server.xml file.

<?xml version='1.0' encoding='utf-8'?>
<Server port="-1" shutdown="SHUTDOWN">
...
<Service name="Catalina">
...
<Engine name="Catalina" defaultHost="localhost">
<Cluster className="org.apache.catalina.ha.tcp.SimpleTcpCluster"/>
...
</Engine> 
</Service>
</Server> 


2. Change the TCP/IP listen ports on each tc Server instance to be unique to avoid port conflicts. This is done by editing the INSTALL_DIR/tcServer-6.0/tcserver1/conf/catalina.properties file and changing the following ports to be unique in each server instance. I just incremented the http, jmx and ajp ports for tcserver2 & tcserver3.

http.port=8080
jmx.port=6969
ajp.port=8009


3. Start all instances and confirm that there are no port conflicts. You'll notice that clustering adds a little overhead to the startup time.

Build and Deploy a Test Web Application

Well we could just stop right here because you now have a running cluster however, I like to test it out just to be sure. In order to do this you need to create a basic web application that can read & write to the HttpSession object. This application will then be deployed to each tc Server instance to test out the cluster. The following are steps using Maven to create a simple web application with a single JSP.

1. Install Maven

2. Create a directory for the web application.

3. Change directory to the web application directory and run this Maven command:

mvn archetype:create -DgroupId=com.test -DartifactId=ct-web -DarchetypeArtifactId=maven-archetype-webapp

This command will build a basic web application structure.

4. Edit the PROJECT_DIR/ct-web/src/main/webapp/index.jsp file. Replace the index.jsp contents with the following:

<html>
<head>
<title> TC Server - Cluster Test Web Application</title>
</head>

<body>
<h2> TC Server - Cluster Test Web Application</h2>
<table width="100%" border="1" cellspacing="0" cellpadding="0">
<tr>
<td width="35%" style="font-weight: bold;"> WEB-INF Real Path - application.getRealPath("WEB-INF"):</td>
<td width="65%"><%=application.getRealPath("WEB-INF")%></td>
</tr>
<tr bgcolor="#CCCCCC">
<td style="font-weight: bold;"> Session ID - session.getId() :</td>
<td><%=session.getId()%></td>
</tr>
<tr>
<td style="font-weight: bold;"> App Server Info - application.getServerInfo():</td>
<td><%=application.getServerInfo()%></td>
</tr>
</table>
</body>
</html>


This code will display the physical path to the WEB-INF directory from the ServletContext, HttpSession ID and server information.

5. Edit the PROJECT_DIR/ct-web/src/main/webapp/WEB-INF/web.xml file. Add in the <distributable /> child element of the <web-app> element.

<web-app>
<display-name>Archetype Created Web Application</display-name>

<distributable />

</web-app>


NOTE: This configuration will indicate that the application is suitable for a distributed environment. Another approach would be to edit the INSTALL_DIR/tcServer-6.0/tcserver1/conf/context.xml and add in <Context distributable="true"> for one or all web applications to be distributed.

6. Run the following command to build and package the web application.

$ mvn package
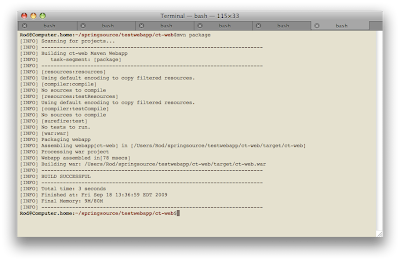


7. You should now have a ct-web/target/ct-web.war file. Copy the WAR file to INSTALL_DIR/tcServer-6.0/tcserver1/webapps directory for each instance.

8. Start all of the server instances.

Test the cluster

To test out the cluster simply open a web browser and create tabs (or windows) for each of the following addresses:

http://localhost:8080/ct-web/
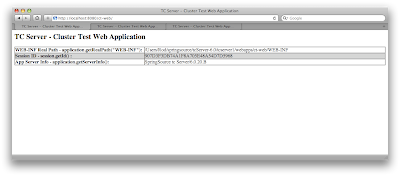


http://localhost:8081/ct-web/
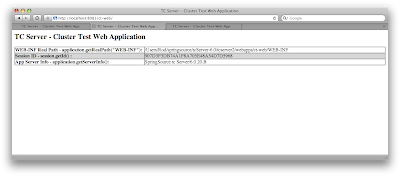


http://localhost:8082/ct-web/
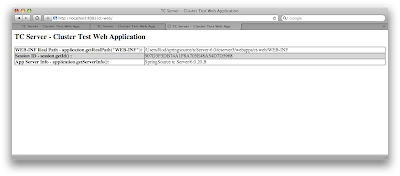


The WEB-INF real path should point to the correct physical directory of each server instance. The session ID should be the same among all three instances indicating that the cluster is working. If it was not working then you would see different session IDs for each tab or window. To further prove this out simply:

1. Shutdown all of the tc Servers.

2. Remove the ../webapps/ct-web.war file and ../webapps/ct-war directory from each tc Server instance.

3. Edit the PROJECT_DIR/ct-web/src/main/webapp/WEB-INF/web.xml in the ct-web application and remove or comment out the <distributable /> element.

4. Run $ mvn clean package to clean out the old build and package up a new ct-web.war file.

5. Start all the tc Server instances.

6. Copy the new ct-web.war file out to all the tc Server instances.

Now the ct-web application is not configured for clustering and when you re-test you should see different session IDs for each server instance.

You now have proved out your fully functioning (3) node tc Server cluster that is replicating session data. The next step would be to put a load balancer in front of the cluster to make it production ready. Again, if you are dealing with a large number of tcServer nodes then a more advanced cluster configuration maybe necessary.

Thursday, September 17, 2009

Blog change

Some may notice that I've changed my blog title and description. The reason is simple, I want to be able to blog about various technology and experiences outside of SOA without having to create a new blog. So I "re-purposed" The SOA Lab blog to be more general hence "The Tech Lab". It's a small change I know but I felt it needed to be done.

Sunday, July 19, 2009

Open Source Integration Podcast

A few weeks ago a few "charioteers" got together to discuss integration tools and techniques over a few beers :)...check it out Episode 35 - A few beers with Chariot's Open Source Integration Experts

Monday, March 9, 2009

Use Hyperic HQ to monitor ServiceMix 4

Recently I've been helping out Tom Purcell (co-worker) with a presentation for our Emerging Technologies for the Enterprise conference being held in Philadelphia on March 26 - 27th, 2009. The presentation is called "The Bus in the Clouds" and it focuses on how organizations can use Amazon web services (i.e. cloud computing) to provide a secure and cost effective means of integration for trading partners.

The presentation is based on a typical use case that Tom has described in his latest blog post. The piece I've been looking at is monitoring and managing ServiceMix 4 (SMX4) using Hyperic HQ. Hyperic HQ is an open source monitoring software designed to manage web applications and infrastructure. What's interesting about Hyperic HQ is that FUSE HQ, MULE HQ and SpringSource Application Management Suite are all based on Hyperic. Now one question you might ask is "why use Hyperic HQ when you can monitor ServiceMix 4 with FUSE HQ?" The simple answer is that we are focused on a "subscription free" solution. Plus, we wanted to use the latest version of Hyperic HQ (v.4.0.3) and FUSE HQ is currently based on v.3.2.

One thing I quickly found out is that the Auto-discovery capability of Hyperic HQ did not find SMX4 "out of the box". Well after some research I found out that SMX4 is NOT one of the 75 common software products and technologies supported by Auto-discovery. Well, if you think about it some more you can probably understand why :) Anyway, after quite a bit of research and some help from Roberto Rojas (co-worker) I finally was able to hook Hyperic HQ into SMX4 to monitor Camel routes (see Roberto's Camel Component for Amazon SQS blog post). It was not that difficult however, not obvious either so I decided to blog about it.

Installation and Configuration

1. Download and install ServiceMix 4
2. Download and install Hyperic HQ. If you're installing Hyperic on one machine then just download the HQ Server Package for your OS. The installer will install both the server and agent.

NOTE: You need to install a plugin for SMX4 so it is best to install both the server and agent in the same directory (e.g. /opt/hyperic or c:\Program Files\Hyperic HQ).

Hyperic Linux Install on CentOS
The following is an example of installing Hyperic using the linux installer:

[chariot@dom:~/downloads/hyperic-hq-installer] ./setup.sh
Unpacking JRE to temporary directory /tmp/jre
Initializing Hyperic HQ 4.0.3 Installation...
Loading taskdefs...
Taskdefs loaded
Choose which software to install:
1: Hyperic HQ Server
2: Hyperic HQ Agent
You may enter multiple choices, separated by commas.
1,2
HQ server installation path [default '/home/hyperic']:
/opt/hyperic
HQ agent installation path [default '/opt/hyperic']:

Loading install configuration...
Install configuration loaded.
Preparing to install...
Validating agent install configuration...
Validating server install configuration...
Checking server webapp port...
Checking server secure webapp port...
Checking server JRMP port...
Checking server JNP port...
Verifying admin user properties
Validating server DB configuration...
Installing the agent...
Looking for previous installation
Unpacking agent to: /opt/hyperic/agent-4.0.3...
Installing the agent JRE ...
Unpacking JRE x86-linux-glibc2-jre-1_5.tar.gz to: /opt/hyperic/agent-4.0.3...
Setting permissions on agent binaries...
Fixing line endings on text files...
--------------------------------------------------------------------------------
Installation Complete:
Agent successfully installed to: /opt/hyperic/agent-4.0.3
--------------------------------------------------------------------------------

You can now start your HQ agent by running this command:

/opt/hyperic/agent-4.0.3/bin/hq-agent.sh start

Installing the server...
Unpacking server to: /opt/hyperic/server-4.0.3...
Creating server configuration files...
Copying binaries and libraries to server installation...
Copying server configuration file...
Copying server control file...
Copying server binaries...
Copying server libs...
Setting up server database...

Now login to another terminal as root and execute this script:

/home/chariot/downloads/hyperic-hq-installer/installer-4.0.3/data/hqdb/tune-os.sh

This script sets up the proper shared memory settings to run the
built-in database.

Press Enter after you run the script to continue this installation.

/etc/sysctl.conf defined an adequate kernel.shmmax, not changing anything

Tuning completed successfully!

Setting up JDBC driver...
Copying database files...
Configuring database...
Starting repopulation of configuration table...
Waiting for built-in database to start (on port 9432)...
Starting built-in database...
Preparing database...
Waiting for server to stop...
Stopping built-in database...
Built-in database stopped.
Installing the server JRE ...
Unpacking JRE x86-linux-glibc2-jre-1_5.tar.gz to: /opt/hyperic/server-4.0.3...
Setting permissions on server binaries...
Fixing line endings on text files...
--------------------------------------------------------------------------------
Installation Complete:
Server successfully installed to: /opt/hyperic/server-4.0.3
--------------------------------------------------------------------------------


You can now start your HQ server by running this command:

/opt/hyperic/server-4.0.3/bin/hq-server.sh start

Note that the first time the HQ server starts up it may take several minutes
to initialize. Subsequent startups will be much faster.

Once the HQ server reports that it has successfully started, you can log in
to your HQ server at:

http://localhost:7080/
username: hqadmin
password: hqadmin

To change your password, log in to the HQ server, click the "Administration"
link, choose "List Users", then click on the "hqadmin" user.


Setup completed.
A copy of the output shown above has been saved to:
/home/chariot/downloads/hyperic-hq-installer/installer-4.0.3/./hq-install.log

Deleting temporary JRE
[chariot@dom:~/downloads/hyperic-hq-installer]

3. Start the server first (e.g. /<hyperic directory>/<server directory>/bin/hq-server.sh start)
4. Wait for the server to start then start the agent (e.g.
/<hyperic directory>/<agent directory>/bin/hq-agent.sh start)
5. Confirm that you can log into the console (http://localhost:7080/). You should see an Auto-discovery portal on the dashboard that has discovered some Hyperic servers/services.
6. Shutdown the server (e.g.
/<hyperic directory>/<server directory>/bin/hq-server.sh stop) and agent (e.g. /<hyperic directory>/<agent directory>/bin/hq-agent.sh stop)
7. Create the directory
/<hyperic directory>/hq-plugins
8. Copy the servicemix-plugin.xml file to the
/<hyperic directory>/hq-plugins directory.
9. Start both the server and agent
10. Log into the Hyperic console http://localhost:7080/
11. On the Dashboard click the Add to Inventory button in the Auto-Discovery portlet. This isn't mandatory but it will give you a chance to see how other services are monitored. For some unknown reason ServiceMix4 will NOT be listed in Auto-discovery. Therefore you have to add it manually.
12. Click on the Resources tab
13. Click on Platforms link then click on the server listed (should only be one)
14. Click on the Inventory tab
15. Scroll down to the Servers area and click on the New link
16. Enter in the following information:

Name:
<some unique name> e.g. ServiceMix 4
Description:
<a description>
Server Type: select 'ServiceMix 4.x' from the dropdown list
Install Path:
<path to the root directory where SMX4 is installed>

17. Save the new server and you should see a ServiceMix server listed

Note: After manually adding the ServiceMix4 server you may be asked (presented a link) to configure the properties for the server. Click on the properties link and enter in the JMX password for servicemix (default password is 'smx') then save your changes.

The servicemix-plugin.xml file can be modified to monitor other areas of SMX4. Before going down that path I recommend that you read through the Hyperic documentation to get an understanding on how plugins work.

Hopefully I didn't miss anything...let me know if I did.

Monday, February 16, 2009

SOA Governance Refcard

I'm a pragmatist and this blog focuses on integration/SOA technology so one might wonder why am I blogging about SOA governance? Well let me say this first, governance is a real challenge for companies and I've seen first hand how large corporations struggle with adoption and change that comes with SOA. When I'm consulting on SOA engagements, I find myself getting pulled into meetings and conversations about SOA governance. Early adopters struggle with not only what they need to do with governance but more importantly how to effectively introduce change in their organization. I came across a very good refcard by Todd Biske that clearly and concisely addresses the "what" in SOA Governance...I highly recommend it. "How" to implement governance in an organization is somewhat unique and doesn't lend itself to a refcard or template.

So, to answer my earlier question about why this post on this blog...SOA is an enterprise initiative and if you're working with SOA technology you will eventually be faced with governance. So, to have something in your back pocket to help others or simply refer to is a great asset.