I've decided to start a new blog biresch.com. Why? Well when I started this blog the primary focus was on SOA and Integration. At the time creating a blog focused on SOA technologies seemed like a good idea. Now years later, I find this focus blog is limiting my ability to blog on other things that find interesting even if it's not of a technical nature.
This blog will remain available however, I won't be adding any new content. All new content will be posted on biresch.com. I hope you stop by and take a look.
Cheers!
Wednesday, February 13, 2013


Thursday, January 26, 2012
7th Annual Emerging Technologies for the Enterprise
My company Chariot Solutions is hosting the 7th Annual Emerging Technologies for the Enterprise April 10-12th in Philadelphia, PA. This is an awesome event and the only one like it on the east coast. I believe we have the best line up of speakers this year ever. There's always great food and a lot of fun. The hotel is only a block from Chestnut Street in Olde City where there's plenty of places to grab a drink and relax. Hope to see you there!
Tuesday, January 4, 2011
Completely Remove MySQL on Mac OS X
I was getting my Mac ready to do some Rails development with a MySQL database and I ran into a problem installing MySQL 5.5.8 on OS X 10.6.5. I downloaded the .DMG and ran through the mysql-5.1.54-osx10.6-x86_64.pkg installer without a problem. However, after installing the server and the MySQL.prefPane I could not start the server from the preference pane. Then I noticed that the installer did not run scripts/mysql_install_db as part of the post installation process. Well my first thought is that I obviously did something wrong so I thought I'd remove MySQL and start over again. So, I did some googling and found these steps to completely remove MySQL:
Apparently the receipts are in a different location for the newer versions of MySQL so line #8 was added to clean them out as well. Remember, these steps will completely remove MySQL and any data residing in the default locations.
So, back to my struggles. I ended up installing MySQL 5.5.8 a couple of times using different archives with the same result so this removal process came in real handy...I almost made a script out of it. After getting pretty frustrated with version 5.5.8 I ended up installing version 5.1.54 without a problem and it is running fine!?!?!
Cheers!
- sudo rm /usr/local/mysql
- sudo rm -rf /usr/local/mysql*
- sudo rm -rf /Library/StartupItems/MySQLCOM
- sudo rm -rf /Library/PreferencePanes/My*
- (Edit /etc/hostconfig) sudo vi /etc/hostconfig (Remove line MYSQLCOM=-YES)
- sudo rm -rf /Library/Receipts/mysql*
- sudo rm -rf /Library/Receipts/MySQL*
- sudo rm -rf /var/db/receipts/com.mysql.*
Apparently the receipts are in a different location for the newer versions of MySQL so line #8 was added to clean them out as well. Remember, these steps will completely remove MySQL and any data residing in the default locations.
So, back to my struggles. I ended up installing MySQL 5.5.8 a couple of times using different archives with the same result so this removal process came in real handy...I almost made a script out of it. After getting pretty frustrated with version 5.5.8 I ended up installing version 5.1.54 without a problem and it is running fine!?!?!
Cheers!
Wednesday, September 22, 2010
Chariot Solutions Fall Events
Here are a couple of events that I'd recommend considering...
Continuous Integration for the Enterprise - Tuesday, October 12, 2010
Mobile Application Development Series - Tuesday, November 9th, 2010
Cheers!
Continuous Integration for the Enterprise - Tuesday, October 12, 2010
Mobile Application Development Series - Tuesday, November 9th, 2010
Cheers!
Tuesday, August 3, 2010
PGP Encryption with Mule ESB
Recently I encounter an encryption problem in Mule ESB that surprised me...I could not figure out how to encrypt a message?!?! I wasn't able to find an example on how PGP "encryption" should be configured even after numerous google and mule forum searches. I was getting a little concerned that the PGP support in mule may be for decryption only. The PGP Security documentation shows how to setup a security filter to decrypt messages but no example for encrypting (that may change soon...more on that later). I finally posted a question on the mule forum and got some help from the community.
First of all, I should of been looking at the transformers in mule to perform encryption...duh! I was so focused on trying to get the security filter to encrypt messages that I forgot about transformers...I know it's hard to image :) I found out the there is an <encrypt-transformer> and was a little embarrassed that I didn't find it before. So, I configured the <encrypt-transformer> to use the <pgp:keybased-encryption-strategy> just like I did for the security filter per the PGP Security documentation. I thought "wow, that was easy", ran my configuration and got a NullPointerException. :(
I could see in the stacktrace that the problem was in the KeyBasedEncryptionStrategy, which was surprising because I was referencing the same <pgp:keybased-encryption-strategy> configuration in the security filter and that was working fine. Then after taking a closer look at the security filter configuration I noticed that I was missing a reference to the credentialsAccessor. The problem I was faced with is how to configured the <encrypt-transformer> to use the credentialsAccessor I was using? Spring to the rescue! The solution is quite simple. Basically, all I had to do was inject the credentialsAccessor into the KeyBasedEncryptionStrategy. To do that I had to configure a new spring bean (id="keyBEStrategy" below) and inject my keyManager and credentialsAccessor. The nice thing about this solution is that the <encrypt-transformer> can still be used as is with just referencing the newly created strategy (i.e., strategy-ref="keyBEStrategy"). Here's an example configuration:
This workaround is pretty clean. MuleSoft is going to review the solution and possibly update their documentation accordingly.
Cheers!
First of all, I should of been looking at the transformers in mule to perform encryption...duh! I was so focused on trying to get the security filter to encrypt messages that I forgot about transformers...I know it's hard to image :) I found out the there is an <encrypt-transformer> and was a little embarrassed that I didn't find it before. So, I configured the <encrypt-transformer> to use the <pgp:keybased-encryption-strategy> just like I did for the security filter per the PGP Security documentation. I thought "wow, that was easy", ran my configuration and got a NullPointerException. :(
I could see in the stacktrace that the problem was in the KeyBasedEncryptionStrategy, which was surprising because I was referencing the same <pgp:keybased-encryption-strategy> configuration in the security filter and that was working fine. Then after taking a closer look at the security filter configuration I noticed that I was missing a reference to the credentialsAccessor. The problem I was faced with is how to configured the <encrypt-transformer> to use the credentialsAccessor I was using? Spring to the rescue! The solution is quite simple. Basically, all I had to do was inject the credentialsAccessor into the KeyBasedEncryptionStrategy. To do that I had to configure a new spring bean (id="keyBEStrategy" below) and inject my keyManager and credentialsAccessor. The nice thing about this solution is that the <encrypt-transformer> can still be used as is with just referencing the newly created strategy (i.e., strategy-ref="keyBEStrategy"). Here's an example configuration:
<?xml version="1.0"?>
<mule xmlns="http://www.mulesource.org/schema/mule/core/2.2"
xmlns:xsi="http://www.w3.org/2001/XMLSchema-instance"
xmlns:spring="http://www.springframework.org/schema/beans"
xmlns:file="http://www.mulesource.org/schema/mule/file/2.2"
xmlns:pgp="http://www.mulesource.org/schema/mule/pgp/2.2"
xmlns:stdio="http://www.mulesource.org/schema/mule/stdio/2.2"
xsi:schemaLocation="http://www.springframework.org/schema/beans
http://www.springframework.org/schema/beans/spring-beans-2.5.xsd
http://www.mulesource.org/schema/mule/core/2.2
http://www.mulesource.org/schema/mule/core/2.2/mule.xsd
http://www.mulesource.org/schema/mule/file/2.2
http://www.mulesource.org/schema/mule/file/2.2/mule-file.xsd
http://www.mulesource.org/schema/mule/pgp/2.2
http://www.mulesource.org/schema/mule/pgp/2.2/mule-pgp.xsd
http://www.mulesource.org/schema/mule/stdio/2.2
http://www.mulesource.org/schema/mule/stdio/2.2/mule-stdio.xsd">
<file:connector name="fileConnector" pollingFrequency="10000" streaming="false" autoDelete="true">
<file:expression-filename-parser/>
</file:connector>
<spring:bean id="pgpKeyManager" class="org.mule.module.pgp.PGPKeyRingImpl" init-method="initialise">
<spring:property name="publicKeyRingFileName" value="<path to public keyring>/pubring.gpg"/>
<spring:property name="secretKeyRingFileName" value="<path to private keyring>/secring.gpg"/>
<!-- secretAliasId is the public key -->
<spring:property name="secretAliasId" value="<public key id"/>
<spring:property name="secretPassphrase" value="<password>"/>
</spring:bean>
<spring:bean id="keyBEStrategy" class="org.mule.module.pgp.KeyBasedEncryptionStrategy"
init-method="initialise">
<spring:property name="keyManager" ref="pgpKeyManager"/>
<spring:property name="credentialsAccessor" ref="credentialAccessor"/>
</spring:bean>
<pgp:security-manager>
<pgp:security-provider name="pgpSecurityProvider" keyManager-ref="pgpKeyManager"/>
<pgp:keybased-encryption-strategy name="keyBasedEncryptionStrategy"
keyManager-ref="pgpKeyManager"/>
</pgp:security-manager>
<spring:bean id="credentialAccessor" class="org.mule.module.pgp.FakeCredentialAccessor"/>
<model name="fileInboundModel">
<service name="fileInboundService">
<inbound>
<file:inbound-endpoint connector-ref="fileConnector"
path="./in">
<pgp:security-filter strategyName="keyBasedEncryptionStrategy"
signRequired="true"
credentialsAccessor-ref="credentialAccessor"
keyManager-ref="pgpKeyManager"/>
</file:inbound-endpoint>
</inbound>
<echo-component/>
<outbound>
<pass-through-router>
<file:outbound-endpoint connector-ref="fileConnector" path="./encrypted"
outputPattern="#[header:originalFilename]-#[function:datestamp].gpg">
<encrypt-transformer name="pgpEncrypt" strategy-ref="keyBEStrategy"/>
</file:outbound-endpoint>
</pass-through-router>
</outbound>
</service>
</model>
</mule>
This workaround is pretty clean. MuleSoft is going to review the solution and possibly update their documentation accordingly.
Cheers!
Friday, July 23, 2010
Sending outbound SMTP messages through Gmail with Mule ESB
I'm currently working on a Managed File Transfer (MFT) proof-of-concept for a client using Mule ESB Enterprise. One of the requirements I had to address is the ability to send SMTP email messages when a particular connector failed, i.e. SFTP connection failed. I thought to myself, that's a reasonable request and something that is probably straightforward to do in Mule ESB. Well, if you look at the Mule configuration it is straightforward however, getting to that point using Gmail took some work...so I thought I'd share :)
What you need...
Mule Configuration...
What you need...
- Mule ESB (I'm using Mule ESB Enterprise Version: 2.2.5 Build: 16813 along with Mule Management Console support, i.e. mmc-agent-2.2.5.jar) *
- A test Gmail account
Mule Configuration...
<?xml version="1.0"?>
<mule xmlns="http://www.mulesource.org/schema/mule/core/2.2"
xmlns:xsi="http://www.w3.org/2001/XMLSchema-instance"
xmlns:file="http://www.mulesource.org/schema/mule/file/2.2"
xmlns:smtp="http://www.mulesource.org/schema/mule/smtp/2.2"
xmlns:email="http://www.mulesource.org/schema/mule/email/2.2"
xsi:schemaLocation="http://www.mulesource.org/schema/mule/core/2.2
<mule xmlns="http://www.mulesource.org/schema/mule/core/2.2"
xmlns:xsi="http://www.w3.org/2001/XMLSchema-instance"
xmlns:file="http://www.mulesource.org/schema/mule/file/2.2"
xmlns:smtp="http://www.mulesource.org/schema/mule/smtp/2.2"
xmlns:email="http://www.mulesource.org/schema/mule/email/2.2"
xsi:schemaLocation="http://www.mulesource.org/schema/mule/core/2.2
http://www.mulesource.org/schema/mule/core/2.2/mule.xsd
http://www.mulesource.org/schema/mule/file/2.2
http://www.mulesource.org/schema/mule/file/2.2/mule-file.xsd
http://www.mulesource.org/schema/mule/smtp/2.2
http://www.mulesource.org/schema/mule/smtp/2.2/mule-smtp.xsd
http://www.mulesource.org/schema/mule/email/2.2
http://www.mulesource.org/schema/mule/email/2.2/mule-email.xsd">
<description>Test configuration to send SMTP email through Gmail.</description>
<!-- Configure some properties to work with GMail's SMTP -->
<smtp:gmail-connector name="emailConnector" />
<model name="processInboundFileModel">
<service name="processInboundFileService">
<inbound>
<file:inbound-endpoint
path="./remoteFS">
</file:inbound-endpoint>
</inbound>
<echo-component/>
<outbound>
<pass-through-router>
<smtp:outbound-endpoint
connector-ref="emailConnector"
host="smtp.gmail.com"
port="587"
user="<account name>%40gmail.com"
password="<password>"
to="<email addresses>"
from="<account name>@gmail.com"
subject="Test email message"/>
</pass-through-router>
</outbound>
</service>
</model>
</mule>
Cheers!
<description>Test configuration to send SMTP email through Gmail.</description>
<!-- Configure some properties to work with GMail's SMTP -->
<smtp:gmail-connector name="emailConnector" />
<model name="processInboundFileModel">
<service name="processInboundFileService">
<inbound>
<file:inbound-endpoint
path="./remoteFS">
</file:inbound-endpoint>
</inbound>
<echo-component/>
<outbound>
<pass-through-router>
<smtp:outbound-endpoint
connector-ref="emailConnector"
host="smtp.gmail.com"
port="587"
user="<account name>%40gmail.com"
password="<password>"
to="<email addresses>"
from="<account name>@gmail.com"
subject="Test email message"/>
</pass-through-router>
</outbound>
</service>
</model>
</mule>
As indicated, the Mule configuration is very straightforward. You can get most of the information you need from the Mule SMTP Transport documentation except for what Gmail port to use and most importantly the gmail-connector information. That tripped me up for a while until I came across a Mule JIRA issue where someone refer to the configuration in the bookstore example for sending email through Gmail. I still haven't found much information on this connector and what it's doing but it does work and you need to use in order to connect to Gmail.
One other thing that is documented however maybe overlooked is that you need to replace the "@" symbol in the "user" attribute with the URL escape code of "%40".
Monday, September 21, 2009
How To Cluster SpringSource tc Server™
I decided to pull together this HowTo while working on a tc Server screencast for Chariot Solutions' booth at SpringOne 2GX. For the unfamiliar, tc Sever is an enterprise version of Apache Tomcat provided by SpringSource™.
There are a number of differences between tc Server and Apache Tomcat, however, at their core they are the same server. As SpringSource puts it, tc Server is "hardened for enterprise use". There is plenty of information about tc Server on SpringSource's website so I won't go into the details here. The main focus of this post is to describe how to get a small cluster (session replication) of tc Servers up and running.
Clustering
tc Server clustering provides session replication and context attribute replication. Session replication is basically copying the HttpSession object to all members of a cluster each time it has changed. Typical web applications use the HttpSession object to temporarily store user specific information like shopping cart items, security credentials, etc. When the user's web session is terminated (e.g. by the user, server crash, etc.) then all the session data is lost, which can cause serious usability and availability problems. The following steps will provide you with a simple (3) node tc Server session replication cluster, which provides a stable platform configured for high availability.
NOTE: If you have a large cluster with many nodes then SpringSource recommends a more advanced cluster configuration that replicates session information to a single backup member.
What You Need
1. Install a JDK.
NOTE: If you are installing on a 64-bit UNIX platform then you must explicitly set the JAVA_HOME environment variable. This also helps later when creating a tc Server instance using the tcserver-instance.sh script.
2. Unpack the tc Server distribution in a temp directory using the following command.
$ tar -xf tcServer-6.0.20.B-GA-appserver.tar
3. Change to the temp directory containing the unpacked tc Server installation files.
4. Run the installer program using the following command.
$ ./install.sh
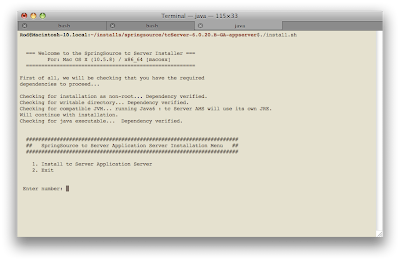
a. Enter a 1 and hit return.
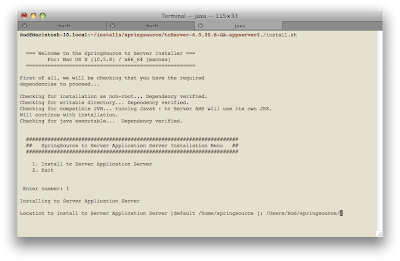
b. Specify the full path to the location where you want to install tc Server and hit return.
NOTE: The installer will not create a directory for you so it must exist.
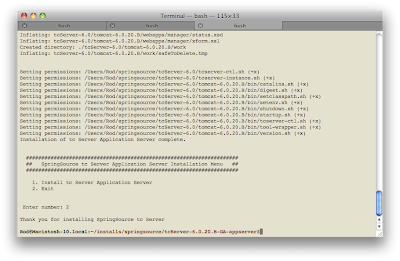
c. Enter a 2 and hit return to exit the installer.
tc Server is now installed with an ASF layout of a tc Server instance. The ASF layout is the Apache Tomcat directory structure layout. There is also a tc Server layout that we will use when clustering the servers. There are some differences between the layouts.
5. Test your installation. First change directory to the bin directory of the default tc Server instance INSTALL_DIR/tcServer-6.0/tomcat-6.0.20.B/bin.
6. Start the tc Server instance.
$ ./tcserver-ctl.sh start
OR
$ ./tcserver-ctl.sh run
The 'start' command starts tc Server as a daemon process. The 'run' command starts tc Server as a foreground process.
7. Open a web browser and point to http://localhost:8080/ and you should see the follow home page for the server.
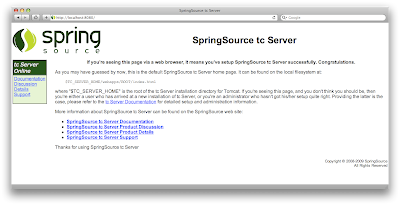
You can now shutdown the server. If you started the server using the 'run' command then you can use ctrl+c to shutdown. If you started the server as a daemon process then use the following command to shutdown:
$ ./tcserver-ctl.sh stop
Congratulations! You've successfully installed and tested tc Server in a few short steps.
Creating tc Server instances
I've decided to use the tc Server layout for the instances so that means we need to create them with a tc Server script.
1. Change directory to the INSTALL_DIR/tcServer-6.0
2. Run the tcserver-instance.sh with the required -s (servername) and -v (tc Server version) options.
$ ./tcserver-instance.sh -s tcserver1 -v 6.0.20.B
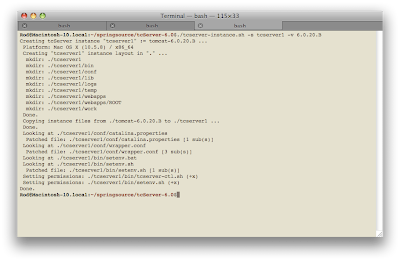
3. Repeat step #2 two more times for servername tcserver2 & tcserver3. You should have a directory structure similar to this:
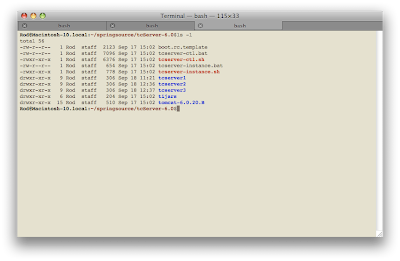
4. Test each instance (tcserver1, tcserver2 & tcserver 3) one at a time to confirm that they start up ok. Since all 3 instances are using the same ports right now you have to test one at a time.
Configure Clustering
1. For each tc Server instance (tcserver1, tcserver2 & tcserver3) add the following <Cluster> child element of the <Engine> element in the INSTALL_DIR/tcServer-6.0/tcserver1/conf/server.xml file.
2. Change the TCP/IP listen ports on each tc Server instance to be unique to avoid port conflicts. This is done by editing the INSTALL_DIR/tcServer-6.0/tcserver1/conf/catalina.properties file and changing the following ports to be unique in each server instance. I just incremented the http, jmx and ajp ports for tcserver2 & tcserver3.
http.port=8080
jmx.port=6969
ajp.port=8009
3. Start all instances and confirm that there are no port conflicts. You'll notice that clustering adds a little overhead to the startup time.
Build and Deploy a Test Web Application
Well we could just stop right here because you now have a running cluster however, I like to test it out just to be sure. In order to do this you need to create a basic web application that can read & write to the HttpSession object. This application will then be deployed to each tc Server instance to test out the cluster. The following are steps using Maven to create a simple web application with a single JSP.
1. Install Maven
2. Create a directory for the web application.
3. Change directory to the web application directory and run this Maven command:
mvn archetype:create -DgroupId=com.test -DartifactId=ct-web -DarchetypeArtifactId=maven-archetype-webapp
This command will build a basic web application structure.
4. Edit the PROJECT_DIR/ct-web/src/main/webapp/index.jsp file. Replace the index.jsp contents with the following:
This code will display the physical path to the WEB-INF directory from the ServletContext, HttpSession ID and server information.
5. Edit the PROJECT_DIR/ct-web/src/main/webapp/WEB-INF/web.xml file. Add in the <distributable /> child element of the <web-app> element.
NOTE: This configuration will indicate that the application is suitable for a distributed environment. Another approach would be to edit the INSTALL_DIR/tcServer-6.0/tcserver1/conf/context.xml and add in <Context distributable="true"> for one or all web applications to be distributed.
6. Run the following command to build and package the web application.
$ mvn package
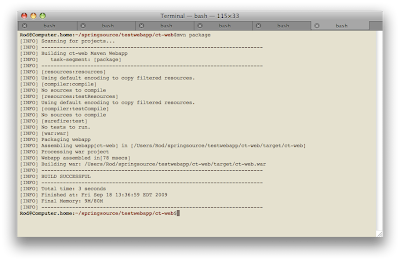
7. You should now have a ct-web/target/ct-web.war file. Copy the WAR file to INSTALL_DIR/tcServer-6.0/tcserver1/webapps directory for each instance.
8. Start all of the server instances.
Test the cluster
To test out the cluster simply open a web browser and create tabs (or windows) for each of the following addresses:
http://localhost:8080/ct-web/
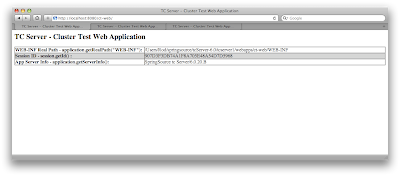
http://localhost:8081/ct-web/
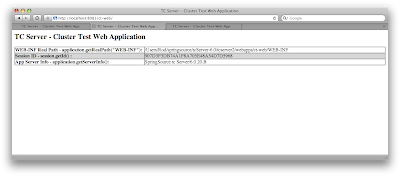
http://localhost:8082/ct-web/
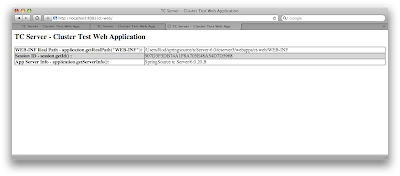
The WEB-INF real path should point to the correct physical directory of each server instance. The session ID should be the same among all three instances indicating that the cluster is working. If it was not working then you would see different session IDs for each tab or window. To further prove this out simply:
1. Shutdown all of the tc Servers.
2. Remove the ../webapps/ct-web.war file and ../webapps/ct-war directory from each tc Server instance.
3. Edit the PROJECT_DIR/ct-web/src/main/webapp/WEB-INF/web.xml in the ct-web application and remove or comment out the <distributable /> element.
4. Run $ mvn clean package to clean out the old build and package up a new ct-web.war file.
5. Start all the tc Server instances.
6. Copy the new ct-web.war file out to all the tc Server instances.
Now the ct-web application is not configured for clustering and when you re-test you should see different session IDs for each server instance.
You now have proved out your fully functioning (3) node tc Server cluster that is replicating session data. The next step would be to put a load balancer in front of the cluster to make it production ready. Again, if you are dealing with a large number of tcServer nodes then a more advanced cluster configuration maybe necessary.
There are a number of differences between tc Server and Apache Tomcat, however, at their core they are the same server. As SpringSource puts it, tc Server is "hardened for enterprise use". There is plenty of information about tc Server on SpringSource's website so I won't go into the details here. The main focus of this post is to describe how to get a small cluster (session replication) of tc Servers up and running.
Clustering
tc Server clustering provides session replication and context attribute replication. Session replication is basically copying the HttpSession object to all members of a cluster each time it has changed. Typical web applications use the HttpSession object to temporarily store user specific information like shopping cart items, security credentials, etc. When the user's web session is terminated (e.g. by the user, server crash, etc.) then all the session data is lost, which can cause serious usability and availability problems. The following steps will provide you with a simple (3) node tc Server session replication cluster, which provides a stable platform configured for high availability.
NOTE: If you have a large cluster with many nodes then SpringSource recommends a more advanced cluster configuration that replicates session information to a single backup member.
What You Need
- tc Server installation - I used a server-only platform neutral distribution (tcServer-6.0.20.B-GA-appserver.tar). You can download an eval from SpringSource's website.
- JDK 1.5 or 1.6 - I used Sun JDK 1.6
- Mac, Unix or Linux platform - you can install on Windows however, the following instructions are specific for a Unix platform.
- Install & Test tc Server
- Create tc Server instances
- Configure Clustering
- Build and Deploy a Test Web Application
- Test the cluster
1. Install a JDK.
NOTE: If you are installing on a 64-bit UNIX platform then you must explicitly set the JAVA_HOME environment variable. This also helps later when creating a tc Server instance using the tcserver-instance.sh script.
2. Unpack the tc Server distribution in a temp directory using the following command.
$ tar -xf tcServer-6.0.20.B-GA-appserver.tar
3. Change to the temp directory containing the unpacked tc Server installation files.
4. Run the installer program using the following command.
$ ./install.sh

a. Enter a 1 and hit return.

b. Specify the full path to the location where you want to install tc Server and hit return.
NOTE: The installer will not create a directory for you so it must exist.

c. Enter a 2 and hit return to exit the installer.
tc Server is now installed with an ASF layout of a tc Server instance. The ASF layout is the Apache Tomcat directory structure layout. There is also a tc Server layout that we will use when clustering the servers. There are some differences between the layouts.
5. Test your installation. First change directory to the bin directory of the default tc Server instance INSTALL_DIR/tcServer-6.0/tomcat-6.0.20.B/bin.
6. Start the tc Server instance.
$ ./tcserver-ctl.sh start
OR
$ ./tcserver-ctl.sh run
The 'start' command starts tc Server as a daemon process. The 'run' command starts tc Server as a foreground process.
7. Open a web browser and point to http://localhost:8080/ and you should see the follow home page for the server.

You can now shutdown the server. If you started the server using the 'run' command then you can use ctrl+c to shutdown. If you started the server as a daemon process then use the following command to shutdown:
$ ./tcserver-ctl.sh stop
Congratulations! You've successfully installed and tested tc Server in a few short steps.
Creating tc Server instances
I've decided to use the tc Server layout for the instances so that means we need to create them with a tc Server script.
1. Change directory to the INSTALL_DIR/tcServer-6.0
2. Run the tcserver-instance.sh with the required -s (servername) and -v (tc Server version) options.
$ ./tcserver-instance.sh -s tcserver1 -v 6.0.20.B

3. Repeat step #2 two more times for servername tcserver2 & tcserver3. You should have a directory structure similar to this:

4. Test each instance (tcserver1, tcserver2 & tcserver 3) one at a time to confirm that they start up ok. Since all 3 instances are using the same ports right now you have to test one at a time.
Configure Clustering
1. For each tc Server instance (tcserver1, tcserver2 & tcserver3) add the following <Cluster> child element of the <Engine> element in the INSTALL_DIR/tcServer-6.0/tcserver1/conf/server.xml file.
<?xml version='1.0' encoding='utf-8'?>
<Server port="-1" shutdown="SHUTDOWN">
...
<Service name="Catalina">
...
<Engine name="Catalina" defaultHost="localhost">
<Cluster className="org.apache.catalina.ha.tcp.SimpleTcpCluster"/>
...
</Engine>
</Service>
</Server>
2. Change the TCP/IP listen ports on each tc Server instance to be unique to avoid port conflicts. This is done by editing the INSTALL_DIR/tcServer-6.0/tcserver1/conf/catalina.properties file and changing the following ports to be unique in each server instance. I just incremented the http, jmx and ajp ports for tcserver2 & tcserver3.
http.port=8080
jmx.port=6969
ajp.port=8009
3. Start all instances and confirm that there are no port conflicts. You'll notice that clustering adds a little overhead to the startup time.
Build and Deploy a Test Web Application
Well we could just stop right here because you now have a running cluster however, I like to test it out just to be sure. In order to do this you need to create a basic web application that can read & write to the HttpSession object. This application will then be deployed to each tc Server instance to test out the cluster. The following are steps using Maven to create a simple web application with a single JSP.
1. Install Maven
2. Create a directory for the web application.
3. Change directory to the web application directory and run this Maven command:
mvn archetype:create -DgroupId=com.test -DartifactId=ct-web -DarchetypeArtifactId=maven-archetype-webapp
This command will build a basic web application structure.
4. Edit the PROJECT_DIR/ct-web/src/main/webapp/index.jsp file. Replace the index.jsp contents with the following:
<html>
<head>
<title> TC Server - Cluster Test Web Application</title>
</head>

<body>
<h2> TC Server - Cluster Test Web Application</h2>
<table width="100%" border="1" cellspacing="0" cellpadding="0">
<tr>
<td width="35%" style="font-weight: bold;"> WEB-INF Real Path - application.getRealPath("WEB-INF"):</td>
<td width="65%"><%=application.getRealPath("WEB-INF")%></td>
</tr>
<tr bgcolor="#CCCCCC">
<td style="font-weight: bold;"> Session ID - session.getId() :</td>
<td><%=session.getId()%></td>
</tr>
<tr>
<td style="font-weight: bold;"> App Server Info - application.getServerInfo():</td>
<td><%=application.getServerInfo()%></td>
</tr>
</table>
</body>
</html>
This code will display the physical path to the WEB-INF directory from the ServletContext, HttpSession ID and server information.
5. Edit the PROJECT_DIR/ct-web/src/main/webapp/WEB-INF/web.xml file. Add in the <distributable /> child element of the <web-app> element.
<web-app>
<display-name>Archetype Created Web Application</display-name>

<distributable />

</web-app>
NOTE: This configuration will indicate that the application is suitable for a distributed environment. Another approach would be to edit the INSTALL_DIR/tcServer-6.0/tcserver1/conf/context.xml and add in <Context distributable="true"> for one or all web applications to be distributed.
6. Run the following command to build and package the web application.
$ mvn package

7. You should now have a ct-web/target/ct-web.war file. Copy the WAR file to INSTALL_DIR/tcServer-6.0/tcserver1/webapps directory for each instance.
8. Start all of the server instances.
Test the cluster
To test out the cluster simply open a web browser and create tabs (or windows) for each of the following addresses:
http://localhost:8080/ct-web/

http://localhost:8081/ct-web/

http://localhost:8082/ct-web/

The WEB-INF real path should point to the correct physical directory of each server instance. The session ID should be the same among all three instances indicating that the cluster is working. If it was not working then you would see different session IDs for each tab or window. To further prove this out simply:
1. Shutdown all of the tc Servers.
2. Remove the ../webapps/ct-web.war file and ../webapps/ct-war directory from each tc Server instance.
3. Edit the PROJECT_DIR/ct-web/src/main/webapp/WEB-INF/web.xml in the ct-web application and remove or comment out the <distributable /> element.
4. Run $ mvn clean package to clean out the old build and package up a new ct-web.war file.
5. Start all the tc Server instances.
6. Copy the new ct-web.war file out to all the tc Server instances.
Now the ct-web application is not configured for clustering and when you re-test you should see different session IDs for each server instance.
You now have proved out your fully functioning (3) node tc Server cluster that is replicating session data. The next step would be to put a load balancer in front of the cluster to make it production ready. Again, if you are dealing with a large number of tcServer nodes then a more advanced cluster configuration maybe necessary.
Thursday, September 17, 2009
Blog change
Some may notice that I've changed my blog title and description. The reason is simple, I want to be able to blog about various technology and experiences outside of SOA without having to create a new blog. So I "re-purposed" The SOA Lab blog to be more general hence "The Tech Lab". It's a small change I know but I felt it needed to be done.
Sunday, July 19, 2009
Open Source Integration Podcast
A few weeks ago a few "charioteers" got together to discuss integration tools and techniques over a few beers :)...check it out Episode 35 - A few beers with Chariot's Open Source Integration Experts
Monday, March 9, 2009
Use Hyperic HQ to monitor ServiceMix 4
Recently I've been helping out Tom Purcell (co-worker) with a presentation for our Emerging Technologies for the Enterprise conference being held in Philadelphia on March 26 - 27th, 2009. The presentation is called "The Bus in the Clouds" and it focuses on how organizations can use Amazon web services (i.e. cloud computing) to provide a secure and cost effective means of integration for trading partners.
The presentation is based on a typical use case that Tom has described in his latest blog post. The piece I've been looking at is monitoring and managing ServiceMix 4 (SMX4) using Hyperic HQ. Hyperic HQ is an open source monitoring software designed to manage web applications and infrastructure. What's interesting about Hyperic HQ is that FUSE HQ, MULE HQ and SpringSource Application Management Suite are all based on Hyperic. Now one question you might ask is "why use Hyperic HQ when you can monitor ServiceMix 4 with FUSE HQ?" The simple answer is that we are focused on a "subscription free" solution. Plus, we wanted to use the latest version of Hyperic HQ (v.4.0.3) and FUSE HQ is currently based on v.3.2.
One thing I quickly found out is that the Auto-discovery capability of Hyperic HQ did not find SMX4 "out of the box". Well after some research I found out that SMX4 is NOT one of the 75 common software products and technologies supported by Auto-discovery. Well, if you think about it some more you can probably understand why :) Anyway, after quite a bit of research and some help from Roberto Rojas (co-worker) I finally was able to hook Hyperic HQ into SMX4 to monitor Camel routes (see Roberto's Camel Component for Amazon SQS blog post). It was not that difficult however, not obvious either so I decided to blog about it.
Installation and Configuration
1. Download and install ServiceMix 4
2. Download and install Hyperic HQ. If you're installing Hyperic on one machine then just download the HQ Server Package for your OS. The installer will install both the server and agent.
NOTE: You need to install a plugin for SMX4 so it is best to install both the server and agent in the same directory (e.g. /opt/hyperic or c:\Program Files\Hyperic HQ).
Hyperic Linux Install on CentOS
The following is an example of installing Hyperic using the linux installer:
3. Start the server first (e.g./<hyperic directory>/ <server directory>/bin/hq-server.sh start)
4. Wait for the server to start then start the agent (e.g. /<hyperic directory>/ <agent directory>/bin/hq-agent.sh start)
5. Confirm that you can log into the console (http://localhost:7080/). You should see an Auto-discovery portal on the dashboard that has discovered some Hyperic servers/services.
6. Shutdown the server (e.g. /<hyperic directory>/ <server directory>/bin/hq-server.sh stop) and agent (e.g. /<hyperic directory>/ <agent directory>/bin/hq-agent.sh stop)
7. Create the directory /hq-plugins
8. Copy the servicemix-plugin.xml file to the /<hyperic directory>/ hq-plugins directory.
9. Start both the server and agent
10. Log into the Hyperic console http://localhost:7080/
11. On the Dashboard click the Add to Inventory button in the Auto-Discovery portlet. This isn't mandatory but it will give you a chance to see how other services are monitored. For some unknown reason ServiceMix4 will NOT be listed in Auto-discovery. Therefore you have to add it manually.
12. Click on the Resources tab
13. Click on Platforms link then click on the server listed (should only be one)
14. Click on the Inventory tab
15. Scroll down to the Servers area and click on the New link
16. Enter in the following information:
Name: < some unique name> e.g. ServiceMix 4
Description: < a description>
Server Type: select 'ServiceMix 4.x' from the dropdown list
Install Path: < path to the root directory where SMX4 is installed>
17. Save the new server and you should see a ServiceMix server listed
Note: After manually adding the ServiceMix4 server you may be asked (presented a link) to configure the properties for the server. Click on the properties link and enter in the JMX password for servicemix (default password is 'smx') then save your changes.
The servicemix-plugin.xml file can be modified to monitor other areas of SMX4. Before going down that path I recommend that you read through the Hyperic documentation to get an understanding on how plugins work.
Hopefully I didn't miss anything...let me know if I did.
The presentation is based on a typical use case that Tom has described in his latest blog post. The piece I've been looking at is monitoring and managing ServiceMix 4 (SMX4) using Hyperic HQ. Hyperic HQ is an open source monitoring software designed to manage web applications and infrastructure. What's interesting about Hyperic HQ is that FUSE HQ, MULE HQ and SpringSource Application Management Suite are all based on Hyperic. Now one question you might ask is "why use Hyperic HQ when you can monitor ServiceMix 4 with FUSE HQ?" The simple answer is that we are focused on a "subscription free" solution. Plus, we wanted to use the latest version of Hyperic HQ (v.4.0.3) and FUSE HQ is currently based on v.3.2.
One thing I quickly found out is that the Auto-discovery capability of Hyperic HQ did not find SMX4 "out of the box". Well after some research I found out that SMX4 is NOT one of the 75 common software products and technologies supported by Auto-discovery. Well, if you think about it some more you can probably understand why :) Anyway, after quite a bit of research and some help from Roberto Rojas (co-worker) I finally was able to hook Hyperic HQ into SMX4 to monitor Camel routes (see Roberto's Camel Component for Amazon SQS blog post). It was not that difficult however, not obvious either so I decided to blog about it.
Installation and Configuration
1. Download and install ServiceMix 4
2. Download and install Hyperic HQ. If you're installing Hyperic on one machine then just download the HQ Server Package for your OS. The installer will install both the server and agent.
NOTE: You need to install a plugin for SMX4 so it is best to install both the server and agent in the same directory (e.g. /opt/hyperic or c:\Program Files\Hyperic HQ).
Hyperic Linux Install on CentOS
The following is an example of installing Hyperic using the linux installer:
[chariot@dom:~/downloads/hyperic-hq-installer] ./setup.sh
Unpacking JRE to temporary directory /tmp/jre
Initializing Hyperic HQ 4.0.3 Installation...
Loading taskdefs...
Taskdefs loaded
Choose which software to install:
1: Hyperic HQ Server
2: Hyperic HQ Agent
You may enter multiple choices, separated by commas.
1,2
HQ server installation path [default '/home/hyperic']:
/opt/hyperic
HQ agent installation path [default '/opt/hyperic']:

Loading install configuration...
Install configuration loaded.
Preparing to install...
Validating agent install configuration...
Validating server install configuration...
Checking server webapp port...
Checking server secure webapp port...
Checking server JRMP port...
Checking server JNP port...
Verifying admin user properties
Validating server DB configuration...
Installing the agent...
Looking for previous installation
Unpacking agent to: /opt/hyperic/agent-4.0.3...
Installing the agent JRE ...
Unpacking JRE x86-linux-glibc2-jre-1_5.tar.gz to: /opt/hyperic/agent-4.0.3...
Setting permissions on agent binaries...
Fixing line endings on text files...
--------------------------------------------------------------------------------
Installation Complete:
Agent successfully installed to: /opt/hyperic/agent-4.0.3
--------------------------------------------------------------------------------

You can now start your HQ agent by running this command:

/opt/hyperic/agent-4.0.3/bin/hq-agent.sh start

Installing the server...
Unpacking server to: /opt/hyperic/server-4.0.3...
Creating server configuration files...
Copying binaries and libraries to server installation...
Copying server configuration file...
Copying server control file...
Copying server binaries...
Copying server libs...
Setting up server database...

Now login to another terminal as root and execute this script:

/home/chariot/downloads/hyperic-hq-installer/installer-4.0.3/data/hqdb/tune-os.sh

This script sets up the proper shared memory settings to run the
built-in database.

Press Enter after you run the script to continue this installation.

/etc/sysctl.conf defined an adequate kernel.shmmax, not changing anything

Tuning completed successfully!

Setting up JDBC driver...
Copying database files...
Configuring database...
Starting repopulation of configuration table...
Waiting for built-in database to start (on port 9432)...
Starting built-in database...
Preparing database...
Waiting for server to stop...
Stopping built-in database...
Built-in database stopped.
Installing the server JRE ...
Unpacking JRE x86-linux-glibc2-jre-1_5.tar.gz to: /opt/hyperic/server-4.0.3...
Setting permissions on server binaries...
Fixing line endings on text files...
--------------------------------------------------------------------------------
Installation Complete:
Server successfully installed to: /opt/hyperic/server-4.0.3
--------------------------------------------------------------------------------


You can now start your HQ server by running this command:

/opt/hyperic/server-4.0.3/bin/hq-server.sh start

Note that the first time the HQ server starts up it may take several minutes
to initialize.  Subsequent startups will be much faster.

Once the HQ server reports that it has successfully started, you can log in
to your HQ server at:

http://localhost:7080/
username: hqadmin
password: hqadmin

To change your password, log in to the HQ server, click the "Administration"
link, choose "List Users", then click on the "hqadmin" user.


Setup completed.
A copy of the output shown above has been saved to:
/home/chariot/downloads/hyperic-hq-installer/installer-4.0.3/./hq-install.log

Deleting temporary JRE
[chariot@dom:~/downloads/hyperic-hq-installer]
3. Start the server first (e.g.
4. Wait for the server to start then start the agent (e.g.
5. Confirm that you can log into the console (http://localhost:7080/). You should see an Auto-discovery portal on the dashboard that has discovered some Hyperic servers/services.
6. Shutdown the server (e.g.
7. Create the directory
8. Copy the servicemix-plugin.xml file to the
9. Start both the server and agent
10. Log into the Hyperic console http://localhost:7080/
11. On the Dashboard click the Add to Inventory button in the Auto-Discovery portlet. This isn't mandatory but it will give you a chance to see how other services are monitored. For some unknown reason ServiceMix4 will NOT be listed in Auto-discovery. Therefore you have to add it manually.
12. Click on the Resources tab
13. Click on Platforms link then click on the server listed (should only be one)
14. Click on the Inventory tab
15. Scroll down to the Servers area and click on the New link
16. Enter in the following information:
Name:
Description:
Install Path:
17. Save the new server and you should see a ServiceMix server listed
Note: After manually adding the ServiceMix4 server you may be asked (presented a link) to configure the properties for the server. Click on the properties link and enter in the JMX password for servicemix (default password is 'smx') then save your changes.
The servicemix-plugin.xml file can be modified to monitor other areas of SMX4. Before going down that path I recommend that you read through the Hyperic documentation to get an understanding on how plugins work.
Hopefully I didn't miss anything...let me know if I did.
Monday, February 16, 2009
SOA Governance Refcard
I'm a pragmatist and this blog focuses on integration/SOA technology so one might wonder why am I blogging about SOA governance? Well let me say this first, governance is a real challenge for companies and I've seen first hand how large corporations struggle with adoption and change that comes with SOA. When I'm consulting on SOA engagements, I find myself getting pulled into meetings and conversations about SOA governance. Early adopters struggle with not only what they need to do with governance but more importantly how to effectively introduce change in their organization. I came across a very good refcard by Todd Biske that clearly and concisely addresses the "what" in SOA Governance...I highly recommend it. "How" to implement governance in an organization is somewhat unique and doesn't lend itself to a refcard or template.
So, to answer my earlier question about why this post on this blog...SOA is an enterprise initiative and if you're working with SOA technology you will eventually be faced with governance. So, to have something in your back pocket to help others or simply refer to is a great asset.
So, to answer my earlier question about why this post on this blog...SOA is an enterprise initiative and if you're working with SOA technology you will eventually be faced with governance. So, to have something in your back pocket to help others or simply refer to is a great asset.
Thursday, September 18, 2008
Cloud Computing Event
I thought I'd pass this along...my company Chariot Solutions is hosting Fall Forecast 2008 - Computing Among The Clouds this October 17th. The 2008 Fall Forecast conference highlights the emerging areas of cloud computing, software as a service and multi-core technologies. What's most appealing to me about cloud computing is the ability to quickly stand up a computing platform with very little investment (both cost and time). This great solution for working with SOA/Integration products because they can demand significant computing resources.
Tuesday, September 16, 2008
RESTful Web Services using IONA FUSE ESB 4.0 Preview and Spring Dynamic Modules
Roberto Rojas has a very nice blog post on RESTful Web Services using IONA FUSE ESB 4.0 Preview and Spring Dynamic Modules, which I highly recommend reading!
Friday, September 5, 2008
What's new in ServiceMix 4.x?
Recently, I was talking with a client about a new project of theirs based on the latest release FUSE ESB 3.x. That got me thinking, I knew that a FUSE ESB 4.0 Preview / ServiceMix 4.x (SMX4) was near release so in my efforts to keep current (as well as inform our client) I decided to take a closer look. I was able to find pretty much information on SMX4 however, I wasn't able to find a concise write-up that touched on key changes between the versions. So after some research I decided to blog about what I found. In this post I'm only focusing on the major changes with this new version without getting too far into the “weeds”.
So, what's new in SMX4? This is the first question I asked when I heard that a new major release of ServiceMix is on the horizon. Like most people, I pulled down the latest binaries of SMX4 and started going through the documentation. However, first before jumping into SMX4 lets get a quick picture of what the ServiceMix 3.x (SMX3) technology stack looks like so we can get a point of reference.

In SMX3 the JBI 1.0 container is a runtime environment for a Normalized Message Router (NMR) and JBI components (e.g. Service Engines and Binding Components) leveraging Apache ActiveMQ as the Message Broker. Typically an ESB offers at least message routing (e.g. ServiceMix EIP & Apache Camel), transformation (e.g. XSLT) and connectivity (e.g. File, JMS, HTTP, etc.) as does SMX3. Apache CXF is used to provide SOAP support and xml marshaling. From an operations perspective, SMX3 provides JMX-based management for running components and other internals as well as run standalone or embedded in an application server or web container (e.g. JBoss, Tomcat, etc.). There is a lot more that SMX3 has to offer however for this post that's a good picture. One last note on SMX3, version 3.2 and higher requires Java 5.
In SMX4 the technology stack really hasn't changed much. The key technologies are still there like Apache ActiveMQ, Apache CXF, JMX, etc. Apache Camel is the preferred technology for routing however, ServiceMix EIP appears to still be supported. Ok, so what has changed?

Looking at the architecture, the most noticeable change is the separation of the JBI container into a ServiceMix Kernel and a ServiceMix NMR. The ServiceMix Kernel is a lightweight OSGi-based environment deployed on Apache Felix (an OSGi R4 Services Platform implementation). The kernel and NMR are their own projects in Apache and can be downloaded and built separately. However, not to worry, if you download FUSE 4 preview (certified release of SMX4) from IONA you get the kernel and NMR bundled along with other stuff to run the ESB.
Why the change to OSGi?
James Strachan (ServiceMix co-founder and committer) pointed out to me that one of JBI's weakest areas is the cumbersome classloader model and that needed to be addressed. OSGi solves this problem with advanced OSGi bundling and classloading mechanisms. Ok, that sounds good but what is OSGi? Well in a nutshell, it is an environment where bundles (modules) communicate through well-defined services while hiding their internals from other bundles. OSGi also specifies how components are installed and managed. Components can be started, stopped, updated and uninstalled dynamically without bringing down the entire server. This is very beneficial for high availability systems (like an ESB). OSGi bundles are versioned and only bundles that can collaborate are wired together in the same class space. This solves the problem with library dependencies or JAR hell :) There are many more benefits to OSGi and the OSGi Alliance is a great place to start learning. With this change, ServiceMix now becomes an OSGi and JBI-based ESB.
What changed in the NMR?
The obvious change is that the NMR is now it's own Apache project, ServiceMix NMR. So, theoretically you could run different versions of the SeviceMix Kernel and NMR. Unfortunately I don't have a good use case for that although, this separation does provide flexibility. The NMR is now a set of OSGi bundles that can be deployed on any OSGi runtime but mainly built on top of the ServiceMix Kernel. The NMR project is also the JBI 1.0 implementation with plans to support JBI 2.0 in the future. There are a few things missing with ServiceMix NMR 1.0-m1 release (from the release notes):
A few other interesting changes to mention. First, SMX4 is now a standalone only runtime. Previous versions supported embedding in application servers, web containers as well as applications. Flows are no longer used for message exchanges. This confused me a little however, thanks to James he clarified things. Flows are NMR flow types that are the mechanism by which the NMR sends messages from one Binding Component or Service Engine to another. SMX3 has 4 flow types that ended up causing confusion and added complexity for developers. This was simplified in SMX4 with a tendency to use explicit routes by exploiting Camel's routing capabilities.
Last change to note, SMX4 no longer performs transaction specific processing. However, it will pass transaction information along as it would any other message. I was fortunate enough to receive some insight from Guillaume Nodet (Apache Project Management Committee Chair and active committer) regarding the changes in transaction support and it turns out that the release notes are a little misleading. Guillaume explained that previously the NMR was considered as a transactional resource, which means the sending of a JBI exchange through the NMR could be part of the transaction (depending if it was sent synchronously or not). This is no longer the case with SMX4. Transactions are now conveyed along with the exchanges whether they are sent synchronously or asynchronously. As a result, the NMR does not need to be aware of transactions because they are now controlled by the different components instead. The benefits from this change include:
So, what's new in SMX4? This is the first question I asked when I heard that a new major release of ServiceMix is on the horizon. Like most people, I pulled down the latest binaries of SMX4 and started going through the documentation. However, first before jumping into SMX4 lets get a quick picture of what the ServiceMix 3.x (SMX3) technology stack looks like so we can get a point of reference.

In SMX3 the JBI 1.0 container is a runtime environment for a Normalized Message Router (NMR) and JBI components (e.g. Service Engines and Binding Components) leveraging Apache ActiveMQ as the Message Broker. Typically an ESB offers at least message routing (e.g. ServiceMix EIP & Apache Camel), transformation (e.g. XSLT) and connectivity (e.g. File, JMS, HTTP, etc.) as does SMX3. Apache CXF is used to provide SOAP support and xml marshaling. From an operations perspective, SMX3 provides JMX-based management for running components and other internals as well as run standalone or embedded in an application server or web container (e.g. JBoss, Tomcat, etc.). There is a lot more that SMX3 has to offer however for this post that's a good picture. One last note on SMX3, version 3.2 and higher requires Java 5.
In SMX4 the technology stack really hasn't changed much. The key technologies are still there like Apache ActiveMQ, Apache CXF, JMX, etc. Apache Camel is the preferred technology for routing however, ServiceMix EIP appears to still be supported. Ok, so what has changed?

Looking at the architecture, the most noticeable change is the separation of the JBI container into a ServiceMix Kernel and a ServiceMix NMR. The ServiceMix Kernel is a lightweight OSGi-based environment deployed on Apache Felix (an OSGi R4 Services Platform implementation). The kernel and NMR are their own projects in Apache and can be downloaded and built separately. However, not to worry, if you download FUSE 4 preview (certified release of SMX4) from IONA you get the kernel and NMR bundled along with other stuff to run the ESB.
Why the change to OSGi?
James Strachan (ServiceMix co-founder and committer) pointed out to me that one of JBI's weakest areas is the cumbersome classloader model and that needed to be addressed. OSGi solves this problem with advanced OSGi bundling and classloading mechanisms. Ok, that sounds good but what is OSGi? Well in a nutshell, it is an environment where bundles (modules) communicate through well-defined services while hiding their internals from other bundles. OSGi also specifies how components are installed and managed. Components can be started, stopped, updated and uninstalled dynamically without bringing down the entire server. This is very beneficial for high availability systems (like an ESB). OSGi bundles are versioned and only bundles that can collaborate are wired together in the same class space. This solves the problem with library dependencies or JAR hell :) There are many more benefits to OSGi and the OSGi Alliance is a great place to start learning. With this change, ServiceMix now becomes an OSGi and JBI-based ESB.
What changed in the NMR?
The obvious change is that the NMR is now it's own Apache project, ServiceMix NMR. So, theoretically you could run different versions of the SeviceMix Kernel and NMR. Unfortunately I don't have a good use case for that although, this separation does provide flexibility. The NMR is now a set of OSGi bundles that can be deployed on any OSGi runtime but mainly built on top of the ServiceMix Kernel. The NMR project is also the JBI 1.0 implementation with plans to support JBI 2.0 in the future. There are a few things missing with ServiceMix NMR 1.0-m1 release (from the release notes):
- no support for JMX deployment and ant tasks
- no support for Service Assemblies Connections
- no support for transactions (a transaction manager and a naming context can be injected into components if they are available as OSGi services, but not transaction processing - suspend / resume - will be performed, as it would be requested for real support)...more on this a little later.
A few other interesting changes to mention. First, SMX4 is now a standalone only runtime. Previous versions supported embedding in application servers, web containers as well as applications. Flows are no longer used for message exchanges. This confused me a little however, thanks to James he clarified things. Flows are NMR flow types that are the mechanism by which the NMR sends messages from one Binding Component or Service Engine to another. SMX3 has 4 flow types that ended up causing confusion and added complexity for developers. This was simplified in SMX4 with a tendency to use explicit routes by exploiting Camel's routing capabilities.
Last change to note, SMX4 no longer performs transaction specific processing. However, it will pass transaction information along as it would any other message. I was fortunate enough to receive some insight from Guillaume Nodet (Apache Project Management Committee Chair and active committer) regarding the changes in transaction support and it turns out that the release notes are a little misleading. Guillaume
- Improved scalability of ServiceMix when using transactions because all JBI exchanges are now sent asynchronously.
- Improved interoperability as the other JBI containers tend to follow the same pattern when/if they support transactions.
Wednesday, May 28, 2008
Building a “SOApp” with Mule (Open Source ESB)
Ok, I know that we're all up to our ears with technical acronyms, terms, buzzwords, etc. that all appear to have some marketing spin to them in hope that they will eventually work their way into industry acceptance. So, why should this be any different...just kidding, kind of :) Anyway, bear with me through this first paragraph and you'll understand how this “SOApp” thing came into existence in my little world. In 2007, I was fortunate enough to be part of a development team at Chariot Solutions responsible for designing and developing a product for the Material Handling and Distribution Industry. After a few requirements gathering sessions with the client, we discovered that the project had a number of integration points with new and existing systems...the age old integration challenge. The existing systems ranged from a COTS warehouse management system to a C-based controller that interfaced with physical hardware devices (e.g. lights, switches, buttons, etc.). Steve Smith (Chariot Architect) was involved early on in the initial discovery sessions and was quick to point out that all these integration points (files, database tables, TCP messages, etc.) we were faced with are very similar to challenges faced while implementing an SOA but on a much smaller scale. So, why not take advantage of the benefits that an ESB provides (i.e. protocol translation, message transformation and routing) to speed development and deliver a maintainable solution? Hence the “SOApp” concept was born. Well, the term “SOApp” (Service Oriented Application) was a play on the SOA acronym about 3 months ago when I was considering writing up a post (this post) to discuss a unique way of using ESB technology. A close second was “Save Our A...”, well you get the picture, anyway, back to the interesting technical stuff.
Ok, so we had a conceptual architecture centered around an ESB. The team was all in agreement that we would benefit from NOT having to write custom integration code and simply focus on developing business logic in POJOs. The decision to use Mule (v. 1.4.1) for the ESB was an easy choice for us because we had plenty of experience using it in our SOA Lab. There were many interesting aspects of the project however, this post focuses on how we dealt with the various integration challenges. Let's take a closer look. The diagram below illustrates what the architecture looks like with a focus on various system interfaces.

Warehouse Management System (WMS) – File-based Interface
The WMS generated flat files in a proprietary format on some random schedule. This data is essential to the overall operation of the entire system. These flat files needed to be processed as soon as the would appear in a directory. A Mule file connector was configured to poll a directory, pickup a file, pass the data onto a POJO for processing and eventually update the PostgreSQL database via Hibernate. Nothing fancy here just basic file processing.
PC Controller – TCP Sockets Interface
This controller serves as a central integration point for various switches, sensors, etc. A basic use case was when a sensor was triggered, the controller would send a proprietary delimited length text message was sent to a particular POJO handling that transaction in Mule. The POJO would typically query the PostgreSQL database and return the resulting data back to the controller. There was a non-functional requirement for the entire transaction to take less 200 ms. At first, we used a Mule TCP connector to communicate (both inbound and outbound) with the controller however, due to some limitations on the controller side (and time constraints) we had to switch outbound communications to custom socket code. Here was a case where we only benefited from using Mule's connectors for one communications direction however, since the socket code was easy enough to write it didn't take long to develop a workaround. Oh, the transaction performance ended up to be less than 100ms on average.
Pick-To-Light Controller – JDBC Connector Interface
This controller was a java-based controller that interfaced physical devices via the PostgreSQL database. Though this is not the “ideal” method for interfacing it was a constraint that we had to deal with. What was interesting about this interface is that we configured a Mule JDBC connector to process incoming requests when information appeared in the database tables. The POJOs that processed the data then used our Hibernate persistence layer to respond back to the controller via database tables.
Java Swing Clients – MuleClient / TCP Interface
There were two Java Swing clients that we developed for administrators and end users to interface with the system. These swing clients used the MuleClient to simplify the TCP communications with Mule. Each POJO was considered a “service” with a unique endpoint deployed in Mule. What is interesting about this is that the swing client only had to specify a single uri (e.g. tcp://localhost:) along with a payload and let the MuleClient handle the rest. There was no need to identify a specific endpoint in the URI, which made this design very flexible and maintainable. Here we leveraged the content-based routing capabilities of Mule by configuring various FilteringOutboundRouter's to call internal POJOs for processing. The outbound routers inspect the payload type and routed accordingly based on configuration.
CLI (Command Line Interface) Java Application – Telnet & MuleClient / TCP Interface
Well I saved the most interesting interface for last, IMHO :) One of the requirements was to have a handheld Windows CE device, capable of scanning barcodes, perform CRUD operations on the PostgreSQL database over a wireless 802.11b network. We had part of this problem solved by using the MuleClient to communicate with our POJOs deployed in Mule. Ok, so, how do we implement the MuleClient on a Windows CE device? Well, John Shepard (Chariot Architect) came up with a clever design to use Telnet and a basic Java application to solve the problem. This was a great example of leveraging proven technology along with a creative way of configuring Unix accounts. The end user accounts were configured to start the CLI java application after a successful login to the Unix machine instead of a bash shell. This work very well and performed beautifully. There was no need to install and manage client applications or worry about performance of the handheld device. The built-in Telnet capability of the Windows CE device was all that was needed on the client. This was very cool to see in action especially knowing that only a basic java application was behind it.
The purpose of this post was to give you an overview of how to use an ESB in new and creative ways aside from their original intent. In the future, I may expand more on these interfaces to provide more detail. There were a number of other interesting aspects to the project like using annotations and XDoclet to automatically generate the Mule configuration, etc. that is good material for future posts. Wrapping this up, we did take on some risk of using Mule in this capacity, however, luckily there were no major problems we ran into. Besides we always had Java to fall back on if Mule came up short anywhere. Could this be the beginning of a new movement in application development...the “SOApp”? Maybe, however I can already hear the snickering of my colleges as they read the end of this post :)
Ok, so we had a conceptual architecture centered around an ESB. The team was all in agreement that we would benefit from NOT having to write custom integration code and simply focus on developing business logic in POJOs. The decision to use Mule (v. 1.4.1) for the ESB was an easy choice for us because we had plenty of experience using it in our SOA Lab. There were many interesting aspects of the project however, this post focuses on how we dealt with the various integration challenges. Let's take a closer look. The diagram below illustrates what the architecture looks like with a focus on various system interfaces.

Warehouse Management System (WMS) – File-based Interface
The WMS generated flat files in a proprietary format on some random schedule. This data is essential to the overall operation of the entire system. These flat files needed to be processed as soon as the would appear in a directory. A Mule file connector was configured to poll a directory, pickup a file, pass the data onto a POJO for processing and eventually update the PostgreSQL database via Hibernate. Nothing fancy here just basic file processing.
PC Controller – TCP Sockets Interface
This controller serves as a central integration point for various switches, sensors, etc. A basic use case was when a sensor was triggered, the controller would send a proprietary delimited length text message was sent to a particular POJO handling that transaction in Mule. The POJO would typically query the PostgreSQL database and return the resulting data back to the controller. There was a non-functional requirement for the entire transaction to take less 200 ms. At first, we used a Mule TCP connector to communicate (both inbound and outbound) with the controller however, due to some limitations on the controller side (and time constraints) we had to switch outbound communications to custom socket code. Here was a case where we only benefited from using Mule's connectors for one communications direction however, since the socket code was easy enough to write it didn't take long to develop a workaround. Oh, the transaction performance ended up to be less than 100ms on average.
Pick-To-Light Controller – JDBC Connector Interface
This controller was a java-based controller that interfaced physical devices via the PostgreSQL database. Though this is not the “ideal” method for interfacing it was a constraint that we had to deal with. What was interesting about this interface is that we configured a Mule JDBC connector to process incoming requests when information appeared in the database tables. The POJOs that processed the data then used our Hibernate persistence layer to respond back to the controller via database tables.
Java Swing Clients – MuleClient / TCP Interface
There were two Java Swing clients that we developed for administrators and end users to interface with the system. These swing clients used the MuleClient to simplify the TCP communications with Mule. Each POJO was considered a “service” with a unique endpoint deployed in Mule. What is interesting about this is that the swing client only had to specify a single uri (e.g. tcp://localhost:
CLI (Command Line Interface) Java Application – Telnet & MuleClient / TCP Interface
Well I saved the most interesting interface for last, IMHO :) One of the requirements was to have a handheld Windows CE device, capable of scanning barcodes, perform CRUD operations on the PostgreSQL database over a wireless 802.11b network. We had part of this problem solved by using the MuleClient to communicate with our POJOs deployed in Mule. Ok, so, how do we implement the MuleClient on a Windows CE device? Well, John Shepard (Chariot Architect) came up with a clever design to use Telnet and a basic Java application to solve the problem. This was a great example of leveraging proven technology along with a creative way of configuring Unix accounts. The end user accounts were configured to start the CLI java application after a successful login to the Unix machine instead of a bash shell. This work very well and performed beautifully. There was no need to install and manage client applications or worry about performance of the handheld device. The built-in Telnet capability of the Windows CE device was all that was needed on the client. This was very cool to see in action especially knowing that only a basic java application was behind it.
The purpose of this post was to give you an overview of how to use an ESB in new and creative ways aside from their original intent. In the future, I may expand more on these interfaces to provide more detail. There were a number of other interesting aspects to the project like using annotations and XDoclet to automatically generate the Mule configuration, etc. that is good material for future posts. Wrapping this up, we did take on some risk of using Mule in this capacity, however, luckily there were no major problems we ran into. Besides we always had Java to fall back on if Mule came up short anywhere. Could this be the beginning of a new movement in application development...the “SOApp”? Maybe, however I can already hear the snickering of my colleges as they read the end of this post :)
Thursday, January 10, 2008
Use JConsole with ActiveMQ for a quick JMS test client
As I was working with OpenESB to try an integrate it with ActiveMQ I stumbled across a quick and easy way work with ActiveMQ. My needs were basic and I just wanted to be able to browse, add and remove messages from a set of queues. I knew that ActiveMQ has JMX support so I wondered if my basic needs could be met using JConsole. Sure enough they were. Here's what I did:
First, I configured ActiveMQ with the queues I needed and started the server (console output below).
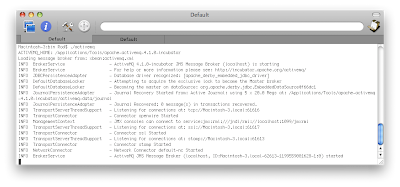
The JMX service connection uri is part of the ActiveMQ startup output (see the last line beginning with INFO ManagementContext). After the server is running you then can start up JConsole by typing jconsole at a terminal/command prompt. The ActiveMQ JMX agent should be displayed in the local tab of the JConsole: Connect to Agent dialog box. If not, you can enter in the management context uri (e.g. service:jmx:rmi:///jndi/rmi://localhost:1099/jmxrmi)
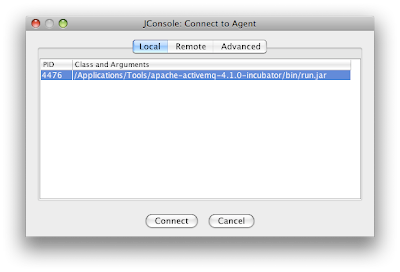
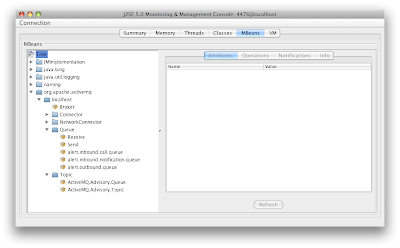
After connecting you will be presented with a Summary screen showing a snapshot of ActiveMQ. From here simply click on the MBeans tab and expand the org.apache.activemq node to see the queues and topics configured in ActiveMQ.
Ok, now we're able perform as many MBean operations that are available. When you're unit testing a JMS service (or application) the first thing you typically do is place a message on a queue. You're probably saying "well duh?" and that's what I'd say. The funny thing is that I find myself spending more time googling for a tool or writing/modifying sample test code to do this simple task. You'll be amazed at how easy it is through jconsole to place a text message on a queue. Again, select the queue you want to put a message on and then on the Operations tab in jconsole and scroll down to the operation sendTextMessage. Fill in the parameter with some text and click the sendTextMessage button.
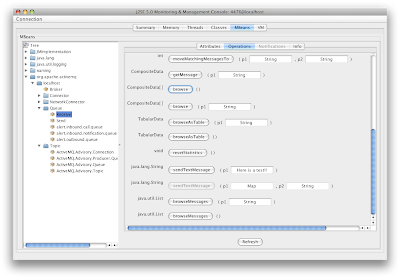
You should see a dialog box pop up with the operation return and a message ID. Congratulations you just put a text message on a queue. You can now experiment with some of the operations like browse, purge, etc. There you have it...a simply easy to use JMS test client.
It's very easy to find the queues and topics in the MBeans tree with a stand-alone instance of ActiveMQ. However, it gets very difficult to even find the ActiveMQ node when you attach to an application server (e.g. Geronimo) that comes bundled with ActiveMQ. I don't have a good answer for that yet.
Happy messaging :)
First, I configured ActiveMQ with the queues I needed and started the server (console output below).

The JMX service connection uri is part of the ActiveMQ startup output (see the last line beginning with INFO ManagementContext). After the server is running you then can start up JConsole by typing jconsole at a terminal/command prompt. The ActiveMQ JMX agent should be displayed in the local tab of the JConsole: Connect to Agent dialog box. If not, you can enter in the management context uri (e.g. service:jmx:rmi:///jndi/rmi://localhost:1099/jmxrmi)

After connecting you will be presented with a Summary screen showing a snapshot of ActiveMQ. From here simply click on the MBeans tab and expand the org.apache.activemq node to see the queues and topics configured in ActiveMQ.

Ok, now we're able perform as many MBean operations that are available. When you're unit testing a JMS service (or application) the first thing you typically do is place a message on a queue. You're probably saying "well duh?" and that's what I'd say. The funny thing is that I find myself spending more time googling for a tool or writing/modifying sample test code to do this simple task. You'll be amazed at how easy it is through jconsole to place a text message on a queue. Again, select the queue you want to put a message on and then on the Operations tab in jconsole and scroll down to the operation sendTextMessage. Fill in the parameter with some text and click the sendTextMessage button.

You should see a dialog box pop up with the operation return and a message ID. Congratulations you just put a text message on a queue. You can now experiment with some of the operations like browse, purge, etc. There you have it...a simply easy to use JMS test client.
It's very easy to find the queues and topics in the MBeans tree with a stand-alone instance of ActiveMQ. However, it gets very difficult to even find the ActiveMQ node when you attach to an application server (e.g. Geronimo) that comes bundled with ActiveMQ. I don't have a good answer for that yet.
Happy messaging :)
Saturday, January 5, 2008
It's been a long time!
Just a quick post to let you know that this blog isn't dead. I know, it has been a long time since my last post. The truth is that I've been involved with a major SOA implementation (using BEA tools) since September 2007. This project is taking up most of my time and unfortunately my blog is feeling the affects :). I hope to get back in the lab soon however, in the meantime I'll be making some random SOA related posts that I hope you'll find useful.
Oh, btw...Chariot Solutions is hosting its annual Emerging Technologies conference in March (http://www.phillyemergingtech.com/). This year there will be an SOA track along with various others. Take a look and hope to see you there!
Oh, btw...Chariot Solutions is hosting its annual Emerging Technologies conference in March (http://www.phillyemergingtech.com/). This year there will be an SOA track along with various others. Take a look and hope to see you there!
Friday, July 6, 2007
Open ESB & GlassFish: JMS messaging (part 2)
The long awaited follow-up to Open ESB & GlassFish: JMS messaging (part 1) is finally here...well, long awaited for me that is :) I've been waiting since March to get back to OpenESB and GlassFish to implement our business use case. My hope for this post was to have GlassFish working with ActiveMQ embedded in Geronimo but I'm not quite there yet. However, I feel confident that I have a solution that will work.
First a quick review on what I was trying to do in part 1. My initial approach to integrating ActiveMQ embedded in Geronimo, was to configure ActiveMQ's resource adapter in GlassFish in order for my business processes to use a set of queues in Geronimo. One thing I realized is that the configuration for my initial approach was taking me down a path of using ActiveMQ in Geronimo for all queuing which was not what I wanted to do. I just wanted to access a set of queues in Geronimo from business processes deployed in GlassFish and use the embedded queuing support in GlassFish for other JMS activity. So I had to start again with my trusty pal Google and it turned up Ramesh Parthasarathy's Blog GlassFish V2 and ActiveMQ 4.1.
Remesh's post describes how to use the generic JMS resource adapter available in GlassFish make ActiveMQ queues available to components deployed in GlassFish. When you get it working your component (MDB) references the ActiveMQ queue through a typical resource reference as you would for a Datasource or other EJBs. The generic resource adapter provides a "bridge" by using JNDI. Some observations about the generic ra support in GlassFish:
What I like:
First a quick review on what I was trying to do in part 1. My initial approach to integrating ActiveMQ embedded in Geronimo, was to configure ActiveMQ's resource adapter in GlassFish in order for my business processes to use a set of queues in Geronimo. One thing I realized is that the configuration for my initial approach was taking me down a path of using ActiveMQ in Geronimo for all queuing which was not what I wanted to do. I just wanted to access a set of queues in Geronimo from business processes deployed in GlassFish and use the embedded queuing support in GlassFish for other JMS activity. So I had to start again with my trusty pal Google and it turned up Ramesh Parthasarathy's Blog GlassFish V2 and ActiveMQ 4.1.
Remesh's post describes how to use the generic JMS resource adapter available in GlassFish make ActiveMQ queues available to components deployed in GlassFish. When you get it working your component (MDB) references the ActiveMQ queue through a typical resource reference as you would for a Datasource or other EJBs. The generic resource adapter provides a "bridge" by using JNDI. Some observations about the generic ra support in GlassFish:
What I like:
- The concept of accessing remote queues as resource references. This is something all J2EE developers understand and can use.
- No coding...this is all configuration based. You do have to code up and configure an MDB to access a remote queue.
- Lots of configuration. I can't pin this on GlassFish, J2EE applications in general have a lot of configuration which lends themselves to delicate deployments. Java EE 5 has made it a lot easier with annotations and dependency injection. However, because of limitations with annotations (i.e. not being able to specify what resource adapter you want to use) I have to use J2EE 1.4.
- The use of com.sun.jndi.fscontext.RefFSContextFactory. This file system-based context factory works fine. However, you need to create and maintain the .bindings file for the generic ra. For example, this means if you create a new queue in ActiveMQ or change a queue name you have to update the .bindings file. I hope to experiment with other context factories within Geronimo but for now I'll continue with the FS context factory.
- Stability and availability. I've experienced some issues with GlassFish not recovering when ActiveMQ is not available and becomes available again.
- Transactional oddities...I'm currently dealing with some odd container-managed transactional exceptions with my MDB using the ActiveMQ queues that I cannot reproduce. Hopefully this is just a configuration problem.
Tuesday, May 22, 2007
Milestone 1: Use Case Implemented in Sun JavaCAPS
Well it's been a long road and I'm happy to announce that we've reach our first milestone in the SOA Lab of an implemented use case using our Virtual Enterprise. Steve Smith and I decided back in late April to combine our efforts and work collaboratively with JavaCAPS to complete the work. This post will focus on my hands on experience with Sun JavaCAPS 5.1.2 and overall impressions with the product.
Impressions of the Sun JavaCAPS tools
Architecture
Java CAPS has been around since the late 1990's and evolved from a traditional hub/spoke architecture to an early ESB architecture consisting of multiple JVMs for each integration point to avoid single point of failure and increase availability. Now the architecture has evolved once again to J2EE utilizing JCA, MDBs, session and entity EJBs, JMS, etc. At the core of Java CAPS is eGate Integrator. The purpose of the eGate system is to translate, transform, and route data between multiple external systems, and translate that data from one to many formats. Some of the key components of eGate are:
Installation/Configuration
Overall the installation and configuration went pretty well, I'd give it a B+. It was disappointing that the Enterprise Designer could not be installed on a non-windows OS. It was a little concerning to hear that the RedHat linux distribution of the integration server was EOL (End Of Life). I guess they're more concerned about Windows at this point. If you stay completely on a Windows platform the installation and configuration is typical of what you'd expect from a windows install (i.e. GUI wizard-like installer).
In our lab we installed the Repository on a CentOS VMWare VM. A couple of small things had to be done to get it to work like:
Development & Debugging
For the most part, the Enterprise Designer seems stable and is easy to use. The repository must be available and accessible in order to use the designer, which is limiting. The communications with the repository introduces latency when creating, modifying and deleting objects, even when the repository is installed on the local machine. The repository has a built in source code control system that locks files, which makes concurrent development difficult if not impossible. The "locking" that happens requires that the user "check out" a business process (BPEL) in order graphically see the process or even look at the properties. There is no support for a 3rd party source code systems (e.g. SVN, CVS, etc). This limitation can certainly become an issue when introducing Java CAPS to an enterprise that has already standardized on a source code control system. Debugging support for Java Collection Definitions is ok. I expected it to be more robust as it is in the NetBeans IDE. I did not try the debugging support for BPEL.
Deployment & Troubleshooting
Building and deploying business processes is heavy. Since Java CAPS deploys a to a J2EE application server, when you build a project you are building a .ear. The most basic business process results in an ear file that is ~5mb in size. Business processes that are built in BPEL are typically ~10mb in size. The process for building the business process is easy and straight forward. I did run into issues with binaries that were not cleaned up that resulted in deployments with unwanted code. This only happened a few times. The Sun SeeBeyond integration server does have pretty good logging to help troubleshoot problems.
Comments
If I had to give Java CAPS a grade based on what I've learned and used it would be a B. (NOTE: I have to mention that I did have quite a bit of training on Java CAPS from Sun and without it my experience with the tools would have been much different.) The development and administrative tools seem pretty good. I'm not that impressed with the heaviness of J2EE, large deployment binaries, lack of support for 3rd party source code control systems, tight coupling between the designer and the repository and the lack of support for open source technology (e.g. Geronimo, ActiveMQ, etc.). We ran into challenges with correlation (see BPEL Correlations introduced using Sun CAPS and BPEL Correlations...as easy as it sounds?). That took us a week or more to get resolved.
Bottom line, building composite applications can be difficult. It's not difficult in the sense of the concepts and tools (once you know them). It's difficult to setup a "complete" development environment (this is where our SOA Lab is real beneficial). This type of development takes a lot more time than it seems it would, we found this out first hand. There are a lot of parts (servers, clients, GUIs, etc.) that have to eventually work together. Depending on how complex your business process is you could be spending a large amount of time just mocking up environments for unit and integration testing. After implementing a fairly straightforward use case I have an appreciation for the term "governance" as it applies to implementing an SOA. Our straightforward use case resulted in 8 business processes (BPEL processes), 2 JCDs (Java Collaboration Definitions) and numerous Java CAPS objects. Ok, now imagine having multiple projects going on at the same time and trying to manage reuse of these objects not to mention the operational support required to keep an eye on everything in production.
What's Next?...
Well, we still have a little clean up to do with the Java CAPS use case implementation. After that then it's back onto either ServiceMix or OpenESB for me. I'm looking forward to comparing a commercial product to an open source project.
Impressions of the Sun JavaCAPS tools
Architecture
Java CAPS has been around since the late 1990's and evolved from a traditional hub/spoke architecture to an early ESB architecture consisting of multiple JVMs for each integration point to avoid single point of failure and increase availability. Now the architecture has evolved once again to J2EE utilizing JCA, MDBs, session and entity EJBs, JMS, etc. At the core of Java CAPS is eGate Integrator. The purpose of the eGate system is to translate, transform, and route data between multiple external systems, and translate that data from one to many formats. Some of the key components of eGate are:
- J2EE compliant middleware services (e.g. Sun SeeBeyond Integration Server aka "Logical Host")
- A messaging server (JMS) - deployed in the Logical Host
- Repository server - The Repository server stores the setup, components, and configuration information for the elements of an eGate Project (Enterprise Designer Project). It also stores the product binary files that are required at run time by the Logical Hosts.
- Java Composite Application Platform Suite Installer - A Web-enabled application used for uploading Composite Application Platform Suite products into the Repository, and then downloading and installing the products from the Repository onto a system.
- Enterprise Manager - web-based application to manage multiple logical hosts.
- Enterprise Designer GUI - development IDE, which is a number of plugins deployed in NetBeans 3.4.
Installation/Configuration
Overall the installation and configuration went pretty well, I'd give it a B+. It was disappointing that the Enterprise Designer could not be installed on a non-windows OS. It was a little concerning to hear that the RedHat linux distribution of the integration server was EOL (End Of Life). I guess they're more concerned about Windows at this point. If you stay completely on a Windows platform the installation and configuration is typical of what you'd expect from a windows install (i.e. GUI wizard-like installer).
In our lab we installed the Repository on a CentOS VMWare VM. A couple of small things had to be done to get it to work like:
- linux installation did not pick up a jre embedded in the installation directory therefore I had to modify the install.sh script to use my jre.
- had to modify the startserver.sh and stopserver.sh to comment out the JAVA_HOME hard coded path because it was wrong. I opted to use my jdk1.5 JAVA_HOME.
Development & Debugging
For the most part, the Enterprise Designer seems stable and is easy to use. The repository must be available and accessible in order to use the designer, which is limiting. The communications with the repository introduces latency when creating, modifying and deleting objects, even when the repository is installed on the local machine. The repository has a built in source code control system that locks files, which makes concurrent development difficult if not impossible. The "locking" that happens requires that the user "check out" a business process (BPEL) in order graphically see the process or even look at the properties. There is no support for a 3rd party source code systems (e.g. SVN, CVS, etc). This limitation can certainly become an issue when introducing Java CAPS to an enterprise that has already standardized on a source code control system. Debugging support for Java Collection Definitions is ok. I expected it to be more robust as it is in the NetBeans IDE. I did not try the debugging support for BPEL.
Deployment & Troubleshooting
Building and deploying business processes is heavy. Since Java CAPS deploys a to a J2EE application server, when you build a project you are building a .ear. The most basic business process results in an ear file that is ~5mb in size. Business processes that are built in BPEL are typically ~10mb in size. The process for building the business process is easy and straight forward. I did run into issues with binaries that were not cleaned up that resulted in deployments with unwanted code. This only happened a few times. The Sun SeeBeyond integration server does have pretty good logging to help troubleshoot problems.
Comments
If I had to give Java CAPS a grade based on what I've learned and used it would be a B. (NOTE: I have to mention that I did have quite a bit of training on Java CAPS from Sun and without it my experience with the tools would have been much different.) The development and administrative tools seem pretty good. I'm not that impressed with the heaviness of J2EE, large deployment binaries, lack of support for 3rd party source code control systems, tight coupling between the designer and the repository and the lack of support for open source technology (e.g. Geronimo, ActiveMQ, etc.). We ran into challenges with correlation (see BPEL Correlations introduced using Sun CAPS and BPEL Correlations...as easy as it sounds?). That took us a week or more to get resolved.
Bottom line, building composite applications can be difficult. It's not difficult in the sense of the concepts and tools (once you know them). It's difficult to setup a "complete" development environment (this is where our SOA Lab is real beneficial). This type of development takes a lot more time than it seems it would, we found this out first hand. There are a lot of parts (servers, clients, GUIs, etc.) that have to eventually work together. Depending on how complex your business process is you could be spending a large amount of time just mocking up environments for unit and integration testing. After implementing a fairly straightforward use case I have an appreciation for the term "governance" as it applies to implementing an SOA. Our straightforward use case resulted in 8 business processes (BPEL processes), 2 JCDs (Java Collaboration Definitions) and numerous Java CAPS objects. Ok, now imagine having multiple projects going on at the same time and trying to manage reuse of these objects not to mention the operational support required to keep an eye on everything in production.
What's Next?...
Well, we still have a little clean up to do with the Java CAPS use case implementation. After that then it's back onto either ServiceMix or OpenESB for me. I'm looking forward to comparing a commercial product to an open source project.
Tuesday, April 17, 2007
First taste of ServiceMix
It's been just over a month since my last post and that's fair too long. So, you might ask, what's going on? Well I had a slight diversion from Java CAPS to take a closer look at ServiceMix. I only spent a little over week looking into ServiceMix so that doesn't justify any kind of experience let alone blog about it. However, for those who are curious but may not have the time to look at ServiceMix, I've decided to share my first impressions.
I started out by installing LogicBlaze FUSE on a CentOS linux VM along with the FUSE Development Environment, which is Eclipse with some plugins. Now why FUSE you might ask? Well FUSE is interesting because it is marketed as a "runtime environment for SOA" that is based on best-of-bread open source projects. Since I was asked to look at the viability of using ServiceMix at an enterprise level, I felt that a platformed based on ServiceMix may have more to offer verses just an ESB. Anyway, back to the fun :) Ok, so now I have FUSE installed and the Development Environment on a linux distro. I start up the IDE and click on the area for a tutorial on the first screen and eclipse crashes! Ok, not a very good start. It seems like most of the SOA products are "happier" on Windows so I switched platforms to a Windows XP VM. Things seemed a little more stable from then on. In the interest of time, my colleague Tom Purcell then took the "ball" with the FUSE stuff and I turned my focus on ServiceMix.
I installed ServiceMix 3.1 stand-alone on my Windows XP VM and started looking at the canned examples (i.e. File Binding and loan-broker). A couple things really impressed me:
Ok, with the good there's always some bad. The bad in this case is lack of documentation and current documentation. For example, I was trying to do a little work with XSQL in ServiceMix and I found a page on the ServiceMix website about it. The problem is that the code snippets and configuration were missing. After plenty of searches, a couple emails to a user group and even pulling down the latest source from subversion I found that the XSQL support was moved to a "sandbox" area. I was encouraged to use a non-JBI compliant JDBC component instead. It's still not clear what the future is for XSQL in ServiceMix. That is just one of many examples where the documentation is lacking. Obviously, this plays a role in an evaluation of any product or project.
Overall I'm very encouraged with what I've seen in a short period of time with ServiceMix. I'm back working with Java CAPS to finish up what I started with our use case in the lab. However, I'm really curious to continue looking at ServiceMix and how it compares to another JBI compliant ESB OpenESB.
I started out by installing LogicBlaze FUSE on a CentOS linux VM along with the FUSE Development Environment, which is Eclipse with some plugins. Now why FUSE you might ask? Well FUSE is interesting because it is marketed as a "runtime environment for SOA" that is based on best-of-bread open source projects. Since I was asked to look at the viability of using ServiceMix at an enterprise level, I felt that a platformed based on ServiceMix may have more to offer verses just an ESB. Anyway, back to the fun :) Ok, so now I have FUSE installed and the Development Environment on a linux distro. I start up the IDE and click on the area for a tutorial on the first screen and eclipse crashes! Ok, not a very good start. It seems like most of the SOA products are "happier" on Windows so I switched platforms to a Windows XP VM. Things seemed a little more stable from then on. In the interest of time, my colleague Tom Purcell then took the "ball" with the FUSE stuff and I turned my focus on ServiceMix.
I installed ServiceMix 3.1 stand-alone on my Windows XP VM and started looking at the canned examples (i.e. File Binding and loan-broker). A couple things really impressed me:
- Ease of Service Assembly deployment - Very similar to deploying a web app (.war file) in Tomcat, just copy your service assembly archive (e.g. loan-broker-sa.zip) into
the deploy directory of the ServiceMix installation home. ServiceMix will then try to load the assembly and tell you if you need anything. - Ease of JBI component installation - wow, it can't get much simpler than this. The loan-broker example require some JBI components that were not installed in my instance of ServiceMix. So, how did I know...well ServiceMix was kind enough to tell me exactly what JBI components I needed in the server log. Here's an example from the log:
10:14:12,571 | WARN  | Timer-4    | AutoDeploymentService    | ramework.AutoDeploymentService  341 |
Components servicemix-lwcontainer are not installed yet: the service
assembly loanbroker deployment
is suspended and will be resumed
once the listed components are installed


10:14:12,883 | INFO  | Timer-4    | AutoDeploymentService    | ramework.AutoDeploymentService  646 |
Directory: deploy: Finished installation
of archive:  loanbroker-sa.zip
What is also very nice is that ServiceMix suspended my assembly until the dependencies were resolved! In this case I need to find the "loanbroker-sa.zip", as the log told me" and copy it intoinstall directory.
Ok, with the good there's always some bad. The bad in this case is lack of documentation and current documentation. For example, I was trying to do a little work with XSQL in ServiceMix and I found a page on the ServiceMix website about it. The problem is that the code snippets and configuration were missing. After plenty of searches, a couple emails to a user group and even pulling down the latest source from subversion I found that the XSQL support was moved to a "sandbox" area. I was encouraged to use a non-JBI compliant JDBC component instead. It's still not clear what the future is for XSQL in ServiceMix. That is just one of many examples where the documentation is lacking. Obviously, this plays a role in an evaluation of any product or project.
Overall I'm very encouraged with what I've seen in a short period of time with ServiceMix. I'm back working with Java CAPS to finish up what I started with our use case in the lab. However, I'm really curious to continue looking at ServiceMix and how it compares to another JBI compliant ESB OpenESB.
Subscribe to:
Posts (Atom)